FOUNDATIONS
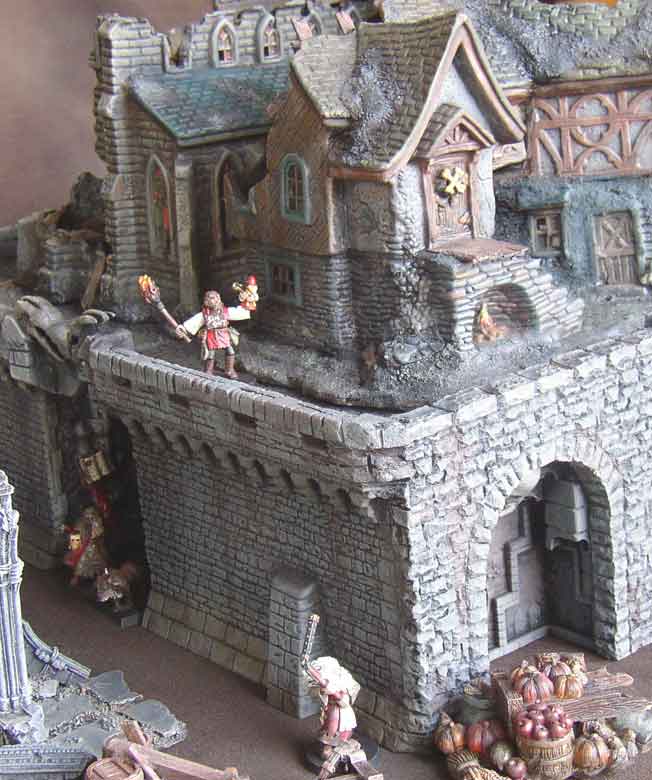
Height can have a big impact on the look and feel of your terrain.
Take a simple Mordheim layout, add a couple platforms and foundations,
and suddenly it feels like a real city, with enclosed courtyards, looming
structures, and dark alleys cast in shadow. Not to mention the tactical
implications. Whether besieged on all sides by zombies, avoiding
a Witch Hunter's four legged friend, or just looking for a good staging
ground for your death-from-above attack, a bit of altitude can really come
in handy. One of the fastest ways to get elevation into play is to
build some simple foundation pieces.
 There are many
ways to make foundation platforms. With nothing more than a
chunk of wood and some textured vinyl or plasticard, you can make a great
looking platform quickly and easily. Around Christmas time, check
stores that carry porcelain Christmas Village decorations- occasionally
they will also sell rolls of textured vinyl to be used for roads.
I found some at WalMart... Try Train and Hobby stores for textured
Plasticard (Plastruct is a common brand). You might also try craft
shops that sell dollhouse accessories. And of course, you can always
cut up plastic scenery kits like the Warhammer Fortress for your textured
plasticard...
There are many
ways to make foundation platforms. With nothing more than a
chunk of wood and some textured vinyl or plasticard, you can make a great
looking platform quickly and easily. Around Christmas time, check
stores that carry porcelain Christmas Village decorations- occasionally
they will also sell rolls of textured vinyl to be used for roads.
I found some at WalMart... Try Train and Hobby stores for textured
Plasticard (Plastruct is a common brand). You might also try craft
shops that sell dollhouse accessories. And of course, you can always
cut up plastic scenery kits like the Warhammer Fortress for your textured
plasticard...
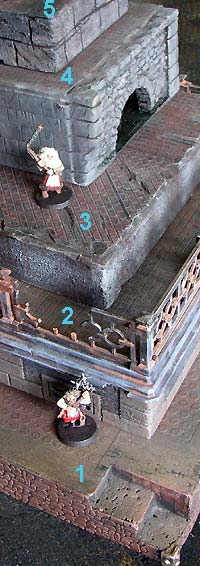
#5: This block started as just a chunk of 2x4 wood.
I used a dremel cutoff wheel to cut stone
lines around the sides and rough it up a bit. Then I rubbed the sides
with some concrete patch to add some texture.
I glued some brick-pattern vinyl on top with superglue and roughed that
up too.
#4: This piece was a bit more work. First
I built a basic box shape out of wood. The front is a resin-cast
tunnel arch piece I got at a model train store. For the stone pattern
on the side, I cut a portion of a Warhammer Fortress wall section and glued
it onto the box.. The top is brick textured vinyl again.
#3: Another basic box shape made from pieces of wood, with a
hardboard top. The brick top is textured vinyl again. I used
a dremel to cut nicks, gaps, and cracks in the brick pattern. The
sides are wood, textured with a light rubbing of concrete patch.
#2: This piece is part of a (rather expensive) Playmobil
brand Mansion (a toy dollhouse). Already replete with iron
fence (was the upstairs patio), vent grates on the sides (for the bottom
floor), and nice stone detail on the sides and top. Aside from attacking
the fence with a pair of nippy cutters,
and running a Dremel over the stone to add some roughness, all I did with
this piece is paint it. This was my first foundation piece, and set
the height standard for all the others since then.
#1: This platform is made from a plastic table top. I cut
out the corners and glued in some chunks of cork to make the steps.
Then I glued stone-pattern vinyl around the sides. The top already
had the dotted pattern molded into the plastic.
To paint your foundation, spray paint it with black or dark brown primer
(flat finish). NOTE: vinyl does not like oil-based paints, including
spraypaint. Avoid spraying vinyl, and if you do hit it with some
paint, wipe it off with a disposable rag before it starts to dry.
You can then drybrush it with various shades of grey and brown.
I use acrylic paints for this step, as they are cheaper than enamels and
dry faster (Apple Barrel is a very affordable brand, 2 oz. bottles for
less than a dollar apiece!). You can also use foam
rubber to sponge-paint it- this is a really fast way to paint large
areas, and adds a bit of grain to your colors too! Just dip the foam
or sponge into your paint, dab most of it off on a piece of paper, and
then wipe, dab or stipple it onto your piece. Once your
drybrushing is dry, you can add various shades of brown washes to
represent rust, grime, etc.
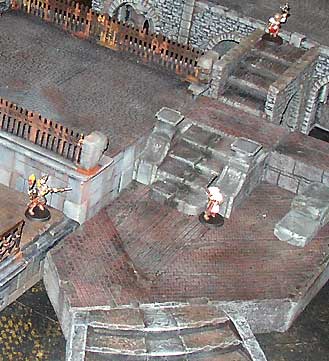 The
height of your foundations should be considered carefully. For my
current city of Mordheim, I have about 5 low foundations (about 1 1/2"
high), mostly used to get buildings up to the same height as the walkways
along the river pieces. I have a few medium height
pieces also, about 3" high (twice the height of a low platform, incidentally)..
So a set of low stairs placed on top of a low platform will reach the same
height as a medium platform (clever, innit?). You can see examples
of this kind of layered stacking in the picture here
I have 3 large foundation pieces, which can be any height really (mine
are about 5" high), as long as you make stairs that can reach that high
(see stairs below). Two of the large platforms can be placed back
to back to create a single massive foundation, complete with tunnels
that cross through underneath, adding a whole new dimension to game play.
When used in combination with custom built stairways, the various heights
allow ascent from ground level all the way up to the tallest platform.
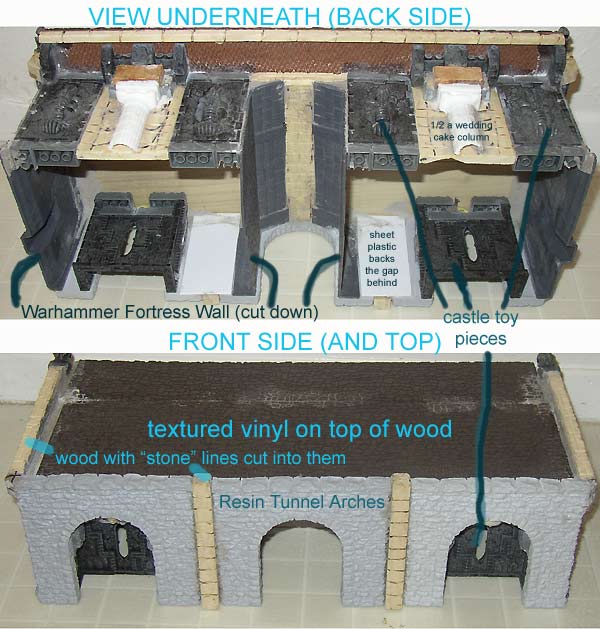
Here's a pic with a bit of info on how I made
my largest pieces, by the way. The castle toy pieces are from the
Megablocks: Dragons sets. Liberal amounts of superglue and baking
soda and concrete patch help hold them together and fill in the gaps..
They include an arch through the middle, and an overhang on one side.
By placing two of these back to back, the overhangs form another tunnel
that runs crosswise to the main tunnels, for those 4-way encounters in
a dark alley...
The
height of your foundations should be considered carefully. For my
current city of Mordheim, I have about 5 low foundations (about 1 1/2"
high), mostly used to get buildings up to the same height as the walkways
along the river pieces. I have a few medium height
pieces also, about 3" high (twice the height of a low platform, incidentally)..
So a set of low stairs placed on top of a low platform will reach the same
height as a medium platform (clever, innit?). You can see examples
of this kind of layered stacking in the picture here
I have 3 large foundation pieces, which can be any height really (mine
are about 5" high), as long as you make stairs that can reach that high
(see stairs below). Two of the large platforms can be placed back
to back to create a single massive foundation, complete with tunnels
that cross through underneath, adding a whole new dimension to game play.
When used in combination with custom built stairways, the various heights
allow ascent from ground level all the way up to the tallest platform.
Here's a pic with a bit of info on how I made
my largest pieces, by the way. The castle toy pieces are from the
Megablocks: Dragons sets. Liberal amounts of superglue and baking
soda and concrete patch help hold them together and fill in the gaps..
They include an arch through the middle, and an overhang on one side.
By placing two of these back to back, the overhangs form another tunnel
that runs crosswise to the main tunnels, for those 4-way encounters in
a dark alley...
Without stairs, platforms can become a tedious exercise in climbing
rolls (at least with our rules). A few well placed stairs can
create interesting access points that often become sites of desperate skirmishes.
The key to making useful stairs is to keep the steps big. It's not
as realistic, but even a 3/4" wide step is big enough to hold most models,
allowing you to place minis on the steps instead of having to stop at the
bottom 'cause you don't have enough move to make it all the way up (argh).
Here's a variety of different stairs and how they were made:
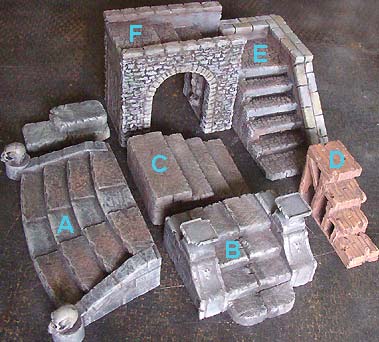 A. This
started as part of that Playmobil Mansion toy. I added textured vinyl
to the steps, and skulls to the posts. I used a Dremel to cut stone
lines into the sides and to rough up the whole piece before painting.
A. This
started as part of that Playmobil Mansion toy. I added textured vinyl
to the steps, and skulls to the posts. I used a Dremel to cut stone
lines into the sides and to rough up the whole piece before painting.
B. Another set of stairs from the Playmobil Mansion toy,
but they were originally much wider (Playmobil is a larger scale than minis,
mind you). I cut the middle out, glued the sides together, and detailed
it like the first stairs.
C. These steps were scratch built, made by layering chunks
of wood on top of each other. Again, they are finished with some
dremeled in stone lines and surfaced with vinyl.
D. These steps are made entirely out of wood. In
fact, I used wood shims as they are cheap and already come cut to 1" wide
strips. I cut off the thick end of the shim to make the steps.
The wood in shims is usually really low grade and quite soft, making it
easy to gouge board lines into them (like the floors in some of my buildings).
The supports are made out of shims that I split into lengths with a pocket
knife. The whole thing was roughed up by shaving bits off with a
knife and attacking it with a pair of nippy cutters. I primed them
with some flat brown camo spray paint, and drybrushed them with varying
shades of brown. A dark brown wash brought out the fine details.
E and F. This elaborate project enables me to reach
my highest platforms, either from a medium height platform (with just the
F piece), or all the way from ground level (with the E piece added).
And of course, the E piece by itself is just the right height to
match up to a medium height platform. The possibilities are endless...
The E piece was painstakingly built out of chunks of wood. To make the
steps, I glued wide strips of wood onto narrow ones, alternating for each
step. This creates recessions at the back of each step, allowing
miniature bases to slide back a bit and hook into the steps. This
allowed me to have very steep steps (goes up faster than it goes out),
but still have enough room for a mini to stand on them. The steps
were surfaced with stone-textured vinyl. The sides of the piece were
textured with Warhammer Fortress wall bits. The railing is just wood
with a stone pattern carved into it (Dremel again).
The F piece is made primarily of two resin-cast arches. I used
wood to form the steps between them, and the outside walls between the
arches. The inside walls are actually parts from a Mega-Blocks Dragon
castle set, chosen for their cool relief-statue detail (you can just see
one inside the arch).
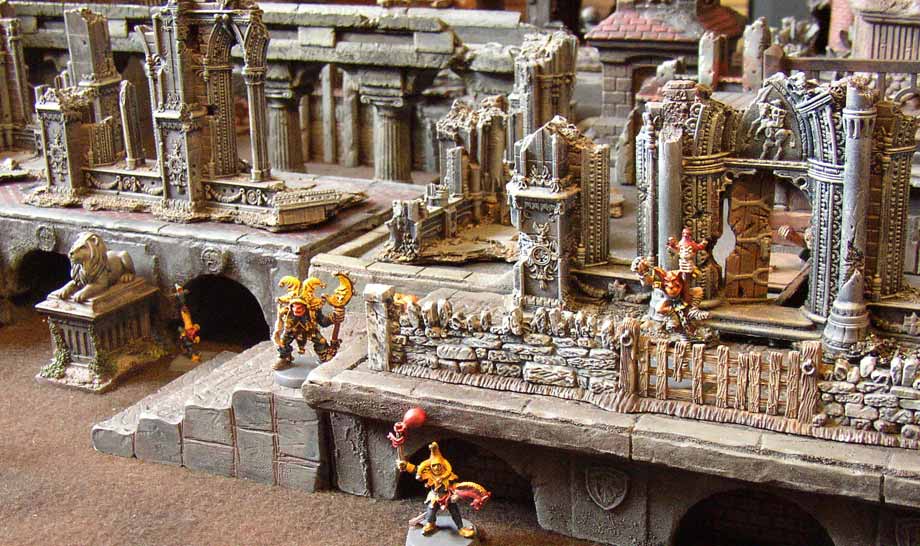
Here's a shot of the latest foundations in action. The arches
are made by cutting a piece of wood with a hole saw, then sawing the wood
ih half to make arches. Cardboard and plastic shields add some detail
to the arches. The foundation tops are surfaced with textured vinyl
again, but this time they are trimmed around the edges with popsicle sticks
that have been trimmed square and notched with a moto-tool cutoff wheel
to have a stone pattern. Texture is added with a moto-tool grinding
wheel and concrete patch.
Back to Mordheim scenery
Back to Necromundicon