MAKING ELDAR TERRAIN
The Eldar aesthetic is not often seen in Terrain. We see plenty
of pictures of their armor, weapons, and vehicles. But what does
a Craftworld, a Crone World, or an Exodite World look like? Surely
there are Eldar and Cityfight players who need to know! Using
an unusual array of materials and a Moto Tool, I set about to answer these
questions the only way I know how.
The first step on the road to successful Eldar terrain is identifying
the common traits of the Eldar Aesthetic. Here's the assumptions
I have made so far:
1. No 90 degree angles. You can save all those rectangles
for your Industrial Gothic terrain...
2. Compound Curves. This means curves with changing
radii, s-curves, and oval shapes. Perfect spheres should be used
for TAU scenery- they have no business on Eldar terrain!
3. Radial symmetry. When cutting notches or gluing
on details, avoid doing things in twos or fours- this tends to lead to
bilaterial symmetry, which just doesn't look as alien. Try using
counts of 3, 5, or 6 when doing repetition of detail.
4. Off-center. Try to have some asymmetry too, just
to break things up a bit. Maybe one prominent piece that juts
out at an interesting angle, or a doorway cut into 2 sides but not the
third.
5. Ribs, Notches, Bumps, Holes. It's easy to fall
into the trap of making "plain" terrain. Keep it interesting, by
using ribbed surfaces, gluing on lots of repetitive detail, and adding
detail to smooth surfaces with a Dremel or drill.
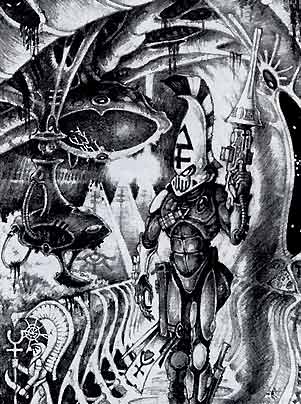 |
This Jes Goodwin illustration has been my favorite source of
inspiration. It was done back when they'd let him draw an entire illustration,
instead of ripping a half-completed character sketch out of his hands before
he could even finish pencil shading the thing...
There's a strong biological feel (that I have yet to capture in my terrain),
with dripping portals, veinlike cracks, and bony shapes everywhere.
But my favorite shape is the device hanging from the cieling, with it's
oval shaped opening, embedded gems, and 3 notched lines slightly off center
on the top edge of the opening. This strongly influenced my use of
the Dremel to add notched detail.
Another good place to look for Eldar structure aesthetic is Jes' sketches
for Battlefleet Gothic (which can be found in his sketchbook, the
Gothic and the Eldritch. I recommend this work, as Jes'
style has been hugely influential on the 40K universe and Eldar in particular. |
Now you need to gather materials. The picture below gives
some insight into the places I've been looking for basic shapes and detail
pieces...
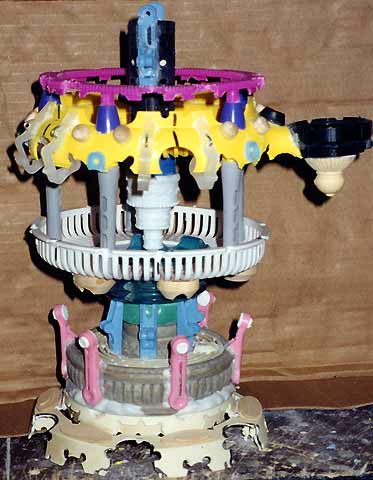 |
Here's a picture of my largest piece yet. This "naked' shot shows
just how goofy your materials might look before being painted. Seriously
though, here's a catalog of the parts used to make this piece.
The central tower at the top is a hair curler tube, flanked by two plastic
clothespin halves (blue). The purple ribbed ring and the yellow piece
are both part of a toy fan designed to blow soap bubbles. I got this
from my friend, who has a good eye for Eldar-esque shapes.
I added several wooden cabs, plus some Christmas Light clips (white) to
this shape to add detail.
The cupola on the right side is the top of a pop-up sprinkler body,
with a detail piece on the bottom cut off the back of an Armorcast Cannon
of Khorne. The White, stepped shape in the center is a toy wedding
cake turned upside down. The grey columns are more hair curler parts,
rollers this time. The white ribbed cage at the bottom is part of
a salad spinner, with more wooden shapes glued underneath.
The dark grey shape near the bottom is a miniature fountain from a Christmas
Village set, embellished with 2 different types of plastic clothespins
(blue and pink). All of this is mounted onto the plastic cover of
a smoke detector (tan). This is detailed with wooden ovals I bought,
pre-made. |
 |
Aside from the bizarre array of materials I use, the biggest secret
to capturing the Eldar "feel" is adding curved notches to everything-
and I mean EVERYTHING. Every major part of the piece pictured above
has had several layers of curved shapes ground into the edges, using a
moto-tool
equipped with a variety of sanding
drums and grinding bits. I like to start with large curves, then
add smaller notches within those to capture that "Jes Goodwin" feel.
My favorite example of this so far can be seen in the close-up shot at
left. This is a doorway I cut into the side of
the main tube on the pop-up sprinkler housing that forms the bulk of one
of my Eldar terrain pieces. |
Of course, if you haven't already, be sure to check out the FINAL
RESULTS of my new line of thinking, including some tips on painting
Eldar Terrain...
Back to the How To pages
Back to Necromundicon