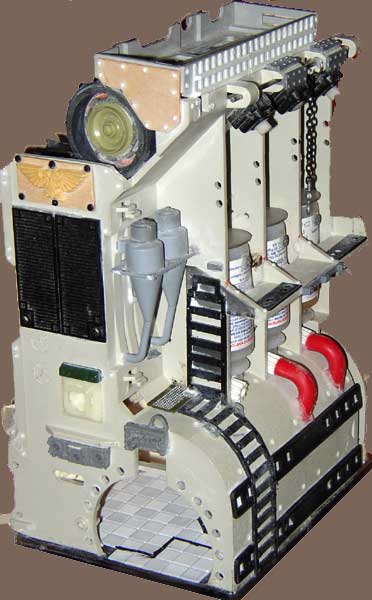
EXTERIOR VIEW
To add more detail to the basic body, I drilled small holes through the printer door. The catwalk at the top is made from a chopped down pullout computer panel. I added some HO scale picket fence along the front edge. I've used it before, but the little fence post tops tend to break off, so this time I glued the face of the fence directly to the piece instead of having it stick up. A quick way to add gothic detail...
You can see the end of a horizontal fuel tank below the top platform (more on the tank below).. I used a plastic disk to plug up the end of the pipe from the inside. Then I glued on a special "nut" found on metal electrical boxes that has a gear-like look to it (you can find these lying around construction sites sometimes). I used a plastic model tank wheel inside that. The end result is quite striking...
The grey dust fans were originally for model train scenery (I need to
get more of those...). The ladders are made of HO scale train track
with rails removed and ties clipped down along the sides. If you
are patient, you can carefully bend these into curves before gluing them
down. The 3 "tanks" are upturned medicine bottles with flight stands
glued on top. The ledge in front of the tanks is added on- it's part
of the piece I cut off the bottom (since the inside has a similar 3-slot
structure down below). The jewelry chain is hung from the metal
pin that formed a hinge for the printer door.

The horizontal fuel tank at the top is made from plastic tubing- I had to be creative when developing the end caps for it. It is a good demonstraion of rivets though- the black ones are 1/2 rouind beads (3 mm), and the white ones are punched out of plasticard (sheet styrene) using a 1/16" hole punch (love that thing). You can see the white rivets used all over this piece. I use an exacto knife to pick up the rivet (by "stabbing" it), then dip it in a puddle of superglue, then press it on. After a second or two the glue holds strong enough that you can pull the exacto knife away (esp. if you are gentle with the "stabbing"). This allows for fast, accurate placement of rivets (thanks to Tim DuPertuis of Armorcast for this tip). .
The winged skull is made from a promotional airline badge and a plastic keyring skull. The 2 control panels at the end of the pipeline and catwalk are made from little toy cranes, chopped down and covered with a Land Raider sponson piece. The "cab" from the crane toy is used as an alarm box, placed over the ground level entrance on the left. The resin pieces at the bottom are Armorcast, slightly modified so they'd fit nicely.
The tile floor was originally for Dollhouses- I carefully cut out a piece to fit between the pipes and tanks and glued it to the base. The orange ladders are from a construction toy (probably out of print now)- I wish I could get more. The roman numeral is from a "build your own clock" kit, and is flanked by small skull and crossbone jewelry charms. The ventilator box features a gargoyle head from the chaos rhino sprue of course. More medicine bottles form tanks at floor level.