 STC PLASMA TOWER
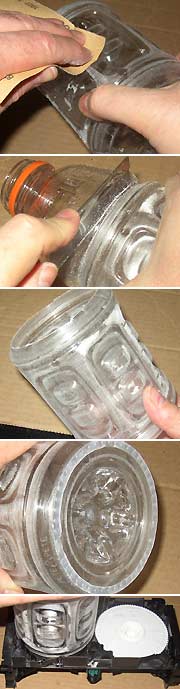
Remove the label from the bottle and sand the surfaces, including the
bottom. Sanding helps the glue and paint to stick better.
Next, there's a groove around the bottle near the top. Use this
groove as a guide and use a razor saw to cut all the way around the bottle,
removing the top. You can use a pair of scissors to trim around the
cut if it isn't clean, just be careful not to cut away too much of the
bottle.
Now grab the other Jack in the Box drink lid and cut away the rivet
ring as before. Glue this rivet ring to the bottom of the bottle
for an extra layer of detail.
Now turn the bottle upside down and check to see how it fits into the platform. It will go in the other tape reel well, opposite the one with the tape reel glued into it. It should fit snug and level. Don't glue it in yet- it's just good to check your fit. If it doesn't fit in well, you might try trimming away a tiny bit along the cut edge until it fits in there.
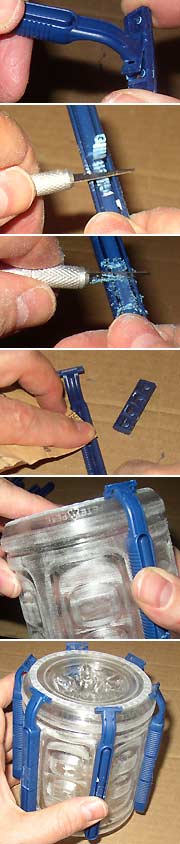
If the razor handles have an unwanted logo or lettering on them, use
a hobby knife to carefully shave it off (be sure to cut away from yourself).
You can further smooth the logo area out by holding the blade perpendicular
to the handle and scraping back and forth.
Sand the inside of the handle to help the glue stick.
The handles go over the six ridges on the Gatorade bottle. Note
that the curved angle on the head of the handle should touch the bottom
(now the "top") of the bottle.
Take extra care when gluing the handles onto the bottle. Try to
get them as centered over the ridges as possible- this ensures a more even
spacing between the handles. (You'll be glad you did).

Now, using a razor saw, carefully saw off all the vents, skulls and
lights off the back of each panel and save them in a small container (we'll
use them for extra detail later).
Try to keep the saw blade as flat against the panel as possible and
cut carefully from the corners inward to preserve the details as you remove
them.
The center strut on the window is not required- go ahead and clip them
out of each panel.
To clean up the top portion, clip under the skull at an angle to either
side, leaving a nice looking point below the skull.
Now to remove the bulkheads from each panel. Saw along the inside
edge of the bulkhead, with the saw blade straight down. You can snap
off the bulkhead if you manage to cut most of the way through, saving some
time.
To help get a better fit onto the bottle, you'll want to use a half-round
metal file to round out the back of each panel. Run the file right
down the middle of the panel, from bottom to top, until you have a noticeable
trough. Don't file too much or you'll start damaging the detail at
the top of the window.
You should now be able to bend the panel slightly in the middle, giving
more of a curved shape to the panel to help it fit on the bottle.
Note that the bottom of the panels is thicker than the top, and may require
more filing before it is thin enough to bend.
Use a hobby knife to clean up any fuzzy bits left behind from the filing.
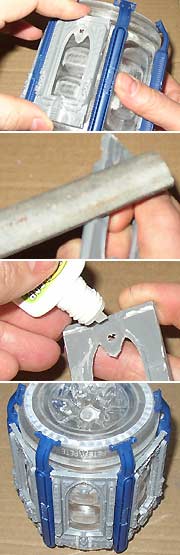
To help the panels fit between the razor handles, you may need to angle
the edges in slightly. File the edges at a downward angle, towards
the back of the panel, on both sides. Once you have a good fit, you're
ready to glue the panel on.
Add glue to the center of the panel, at top and bottom. This is
the most likely point of contact with the bottle. The top of the
panel should line up with the top of the handle, about an inch below the
top of the bottle. Once the panel is tacked in place, see if your
panel edges are close to (or touching) the razor handles- if so, you can
run a bead of glue between them for a stronger bond. Use a poof of
baking soda to help the glue set if you need to.
As you add more panels, keep test fitting and adjusting them to get
a good fit, and try to keep the height of each panel consistent with the
others all the way around.
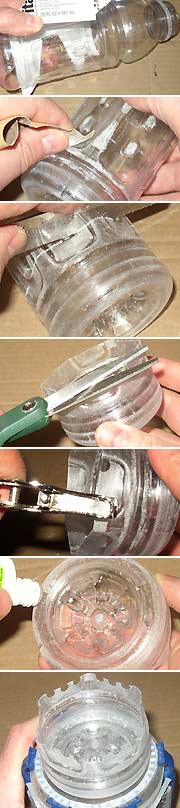
Most bottles have small bumps on the sides. Using the lower bumps
as a guide, saw the bottom of the bottle off, cutting just below the lower
bump. If your bottle has no bumps, measure about 1 1/2 inches up
from the bottom of the bottle, mark, and cut. Keep turning the bottle
and saw through the high points first.
You can use scissors to clean up any rough edges from the sawing.
Now to add some extra crenellation detail. Using a standard hole
punch, punch half circles out of the top edge of the bottle bottom.
Your bottle should have six recessed areas- punch a hole in the corners
of each recession, and one in the center between the corners.
Apply glue to the most raised portion of the bottom of the bottle.
Now just stick it onto the top of the larger bottle! Use the rivet
ring as a guide for centering. Try to line up the six ridges with
the six indentations on the big bottle.

Now you can snap the front end off the clothespin. do this for
all 6 clothespin halves.
You can clean up the ragged edge left by the snapping with a quick clip
of the nippy cutters.
Now to shorten the back ends. Clip into the hole from both sides,
cutting at an angle.
Next, saw the clothespin in half, cutting down the groove where the
spring was.
Once you cut most of the way through, you should be able to snap these
apart. This should leave you with 6 long pieces and 6 short ones.
Using a sanding pad or flat metal file, sand down the back side of all
the components.
Now glue the short pieces around the bottom of the small bottle, centering
them between the razor handles as shown.
Then glue the long pieces in between the short ones, with the clipped end pointing up. They should line up with the razor handles.