ROAD WOLF TERRAIN AND MODELS
On this resource page are
tips for collecting CARS,
BIKES,
TRUCKS, and MONSTERS for
your ROAD WOLF
games, and some ideas for ROADS
for them to battle over!
CARS
What better source for vehicles than Hot Wheels and Matchbox
cars?
At a dollar apiece, you can't go wrong!
Handy steps for "Road Warriorizing" your models:
1. Sand the body down to dull the paint and add scratch and chip
marks to the edges of the vehicle.
2. Sand the wheels down! It gives them a lightened, matte
finish that looks much more like real rubber than the original shiny
plastic.
3. Give them a dark brown wash and a tan drybrush to grunge them
up. Bonus points for rearward streaking- it can make them look
faster
if done right!
4. A silver sharpie is a quick way to pick out any details or
edges to make them look chipped and worn.
5. Add spoilers, blowers, bigger wheels, pipes, ram bars,
fenders,
wire mesh, gas cans, tarps, spikes, weapons, skulls, or anything else
you
like to turn them into true survivalist vehicles!
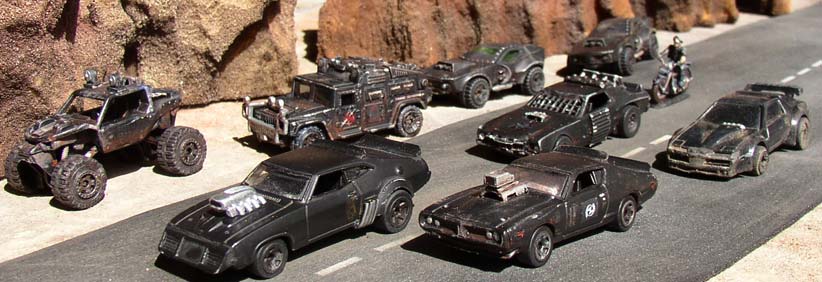
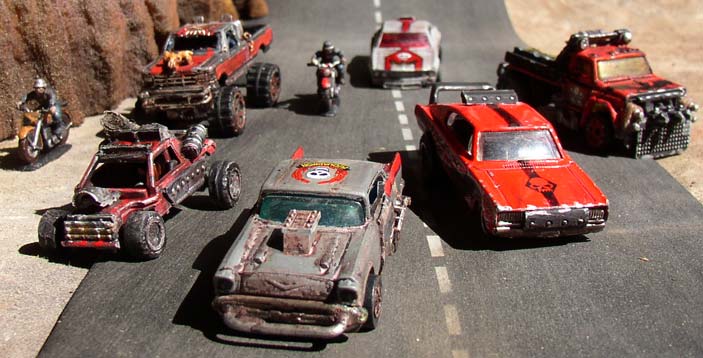
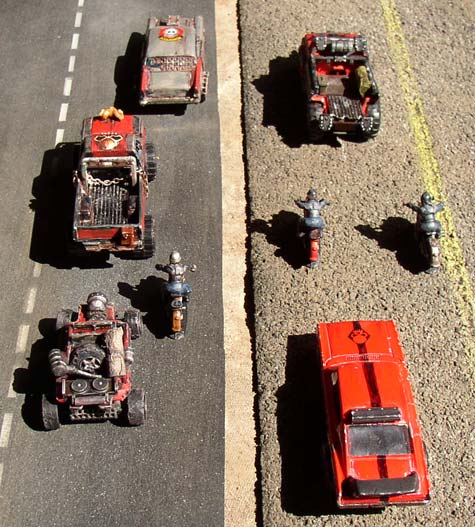
FACTIONS...
You can make it easier to tell what's going on during a game by
creating
different teams, EACH with their own distinct colors and styles.
Below are examples of Enforcers, with their
infamous Interceptors,
a Marauder gang, Rodders,
Survivalists, and even local Police!
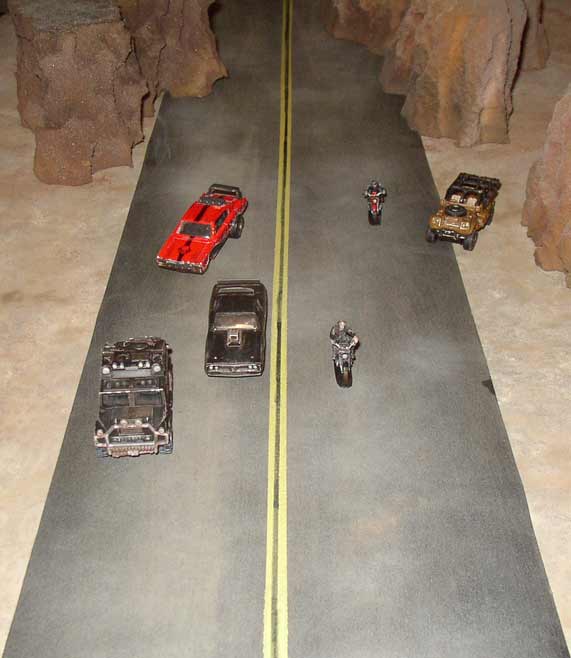
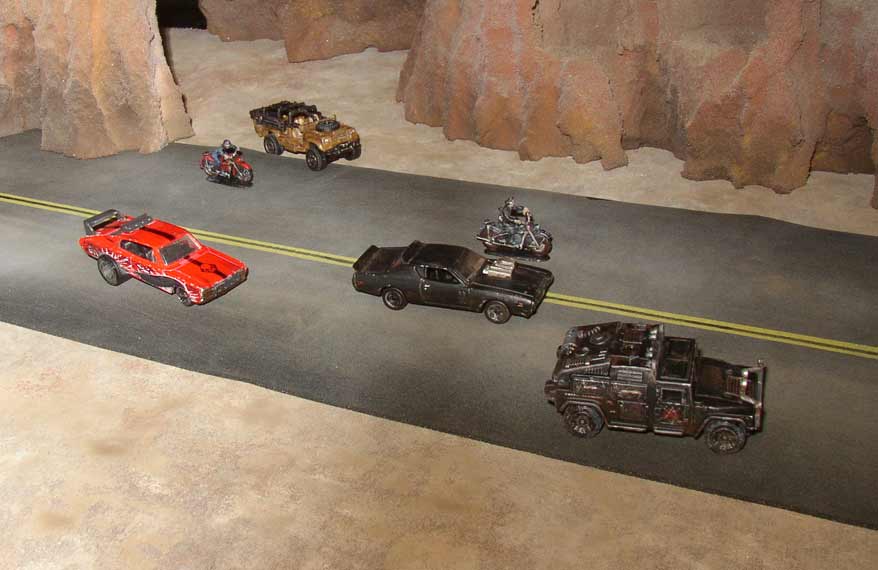
ENFORCERS
Road Wolf is set in a dark time where criminals and savages have a
death grip on the open road. Enforcers have arisen in
response to the violent Road Gangs, using their own brand of brutal
justice
to keep order on the highway. Their black vehicles are as
stark
and brooding as the veterans within.
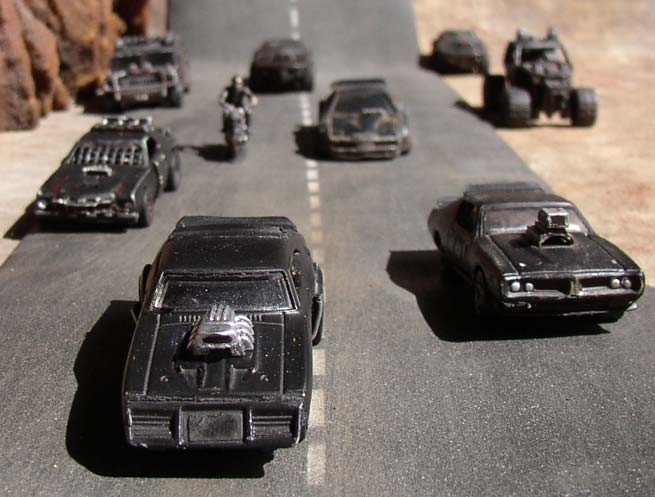
Enforcers prefer supercharged street vehicles for pursuing criminals,
but they will also make use of military-style offroad vehicles to catch
their prey, no matter where they go.
The buggy and the Humvee are Matchbox vehicles (from the Medieval Rides
set). After being primed flat black, they got a brown wash, some
silver sharpie paint chip marks, and a tan drybrushing to dull them
down.
Behind them are two futuristic looking rally-style cars, made of Hot
Wheels
"Sting Rod II" vehicles with their missile launchers removed and a
quick
black paint job added on. The interceptor in the back is a car a
friend of mine made for the original Road Wolf game- over 20 years
ago!
I added a few more details, like the door panels and window grating.
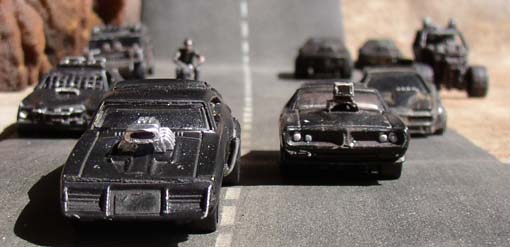
Leading the pack are my two latest interceptor conversions- more on
those below.
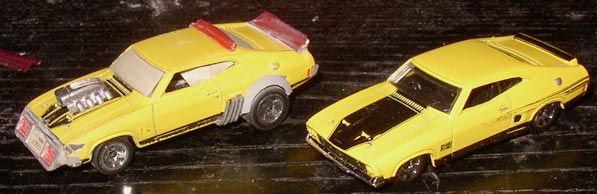
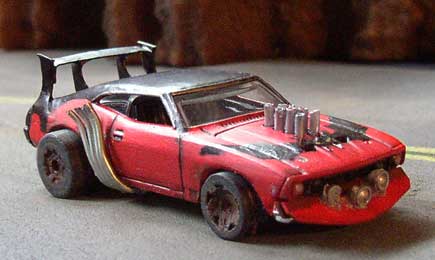
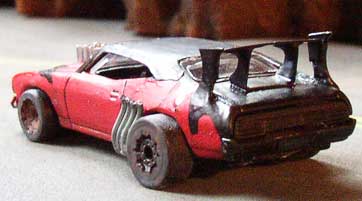
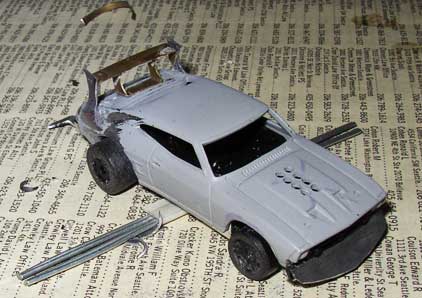
While looking for some good base cars to work with, I found some
Hot Wheels Falcon XBs (in stores now!)- the base car for Mad
Max's
V8 Interceptor!
I attempted my own conversion in tribute to the films that inspired
Road Wolf. It's not perfect, but I feel it is a good
likeness!
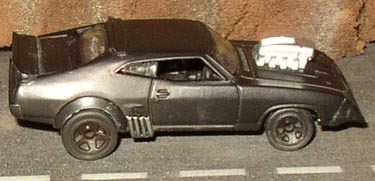
Here's a shot of the conversion next to a stock model.
The front end is completely different. I found a bumper on another
car that had a nice wedge shape- not accurate, but it looks okay and
saved
me a lot of time. I had to use a moto-tool to GRIND the front end of
the
Falcon flat, so I could glue the bumper in place.The blower is also
stolen
from another car and is also not accurate at all, but it had nice clean
detail so I cut it off, primed it silver, and didn't actually glue it
on
until after the rest of the car was painted. Another big change
is
the addition of roof and back spoilers. I had to grind away the
original
spoiler on the back since it was the wrong style. I used plastic
from a Ziploc style plastic container lid, cut it to size, sanded it,
and
glued it on with plenty of CA glue and baking soda to fill the gaps.
The pipes are made of steel wire- I cut four lengths, stuck them
side by side on a piece of tape, added some glue, and closed the tape
up,
leaving a good amount protruding outside the tape. Then I used flat
nose
pliers to bend the four pipes up into shape, then glued the tape end
under
the car after filing a flat spot for them to stick to.
I used the wheels from the original model even though they are the
wrong
style. They needed to come out a LOT more, so I cut them off, and
remounted
them on a slice of dowel to push them about 1/4 inch out from the body.
They don't spin anymore, but you don't want your cars rolling away in
the
middle of a game anyway. The final and most annoying detail are
the
flared fenders- I only did the back ones 'cos they are annoying. I
start
with a Lego disc piece, sand it down on the flat side, and grind away
the
inside with a moto-tool until its only a sliver wide. Then I file the
fender
down just a bit so it's easier to glue on.
Before painting, I sanded the whole thing lightly to help the paint
stick, and sanded all the edges HEAVILY so the metal comes through.
This
way if your paint scrapes off, it just shows metal instead of the base
color (a rather conspicuous yellow in this case).I put masking tape
over
the windows before priming the whole car flat black. Once the paint
dries,
you can BUFF it by rubbing it with your finger to get a slightly more
glossy
finish. Eventually, I'll do a "Road Warrior" version, with the
gas
tanks in the back, more weathering, etc, but before that, I want to
make
a different Road Warrior vehicle- that badass black and red car with
the
bat on the hood. It was based on an XA, I believe, so it should be
pretty
easy to get the right look with another XB.
Other cars can make for nice interceptor conversions too! This
Interceptor started out as a Hot Wheels '71 Dodge Charger.
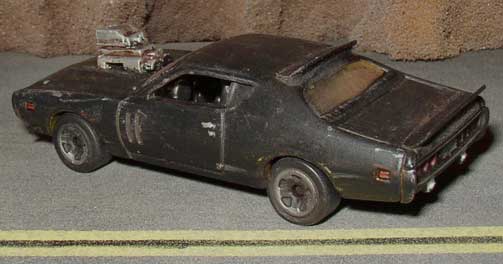
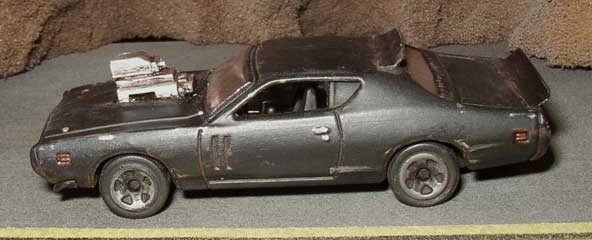
Once again, I made spoilers out of a plastic lid that my lunch meat
came in (Ziploc makes similar ones). The Blower is made out of
Storm
Bolter parts from an old Games Workshop vehicle accessory sprue.
I primed the vehicle flat black and added paint chip marks with a
silver
sharpie marker. Various brown washes and drybrushing give the car a
weathered
look.
RED DEATH
Renegades and marauders have turned to the power of vehicles to pursue
their misguided aims. There are many road gangs out on the
highways,
and one of the most infamous gangs of brutal highwaymen are the Red
Death.
The Red Death favor overpowered vehicles with dangerous
modifications.
Ramming and melee are popular tactics for these brutal machines.
The buggy is simply an interior from a race car with wheels, engine,
and accessories added!
The Chevy's front bumper is a piece of heavy wire inserted into drilled
holes. The car is bare metal with red trim and a brown wash.
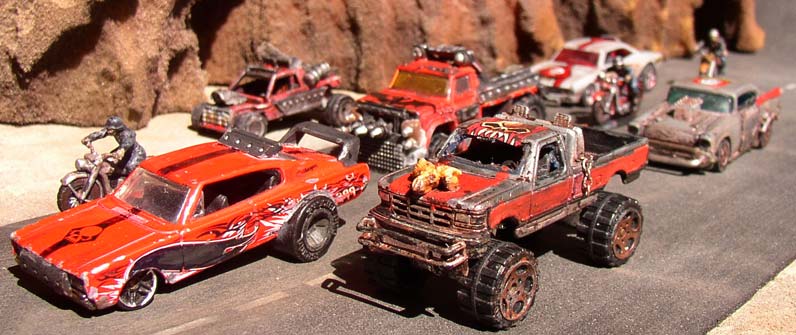
The 4x4 is an old F-150 truck with its windows gutted out, an
additional
bumper added to the front, and some chain added to the back. The
skull on the front is from a Warhammer Beastman skeleton! The
original
paint was stripped off with a moto-tool wire brush, then red stripes
added.
The orc skull on the roof is a Warhammer banner sticker.
The '67 Charger is a converted Hot Wheels '67 Charger with replacement
rear wheels. The front bumper and roof spoiler are small parts
from
an IMEX platformer kit. The rear spoiler is cut off of another
vehicle.
After painting over the "Hot Wheels" text on the side graphics, I added
a skull decal from a Warhammer 40K Imperial Guard transfer sheet and
used
a black sharpie to add a racing stripe.
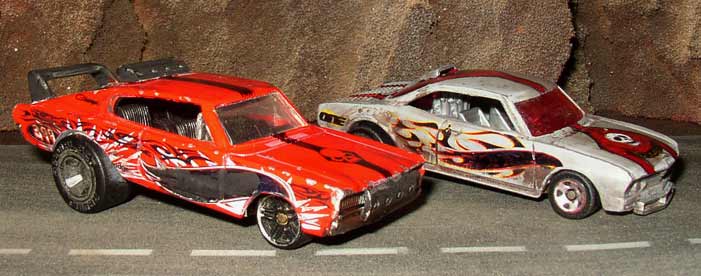
The Grey car recieved a similar treatment, though the skull on the
hood is a sticker from a Zoids toy this time, and a red split stripe
was
added on with a red sharpie.
And finally, you may remember this awesome enemy car from Road
Warrior. I certainly do!
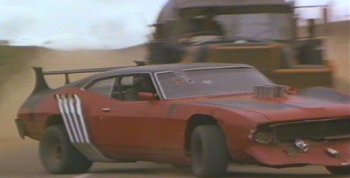
I started with a HW Falcon XB. The spoiler is scratch built from sheet
lead and brass. I used sheet lead for the sides because it is soft, and
easier to blend into the body. To get the basic shapes, I used a hole
punch, then filed things clean with a half round needle file. I also
made the front airdam out of sheet lead, and added spotlights from a
model kit. The hood pipes are wire ties with the wire removed
(basically clear tubing). After drilling holes in the hood, I stuck the
tubing onto a push pin, colored them with a silver sharpie, then added
superglue and plugged them into the holes. They were a pain.

The side pipes are steel wire, glued into a bundle, then bent into
shape and glued onto the bottom of the car. I used a moto-tool to
grind out the fenders. Then I added on some filed down wheels for the
duallies in back. Because the car I started with was yellow, I ground
the paint off with a moto-tool wire brush and then primed with grey. So
the red and black are all hand painted.
RODDERS
Enforcers and Renegades aren't the only ones out on the roads.
Rodders are often grizzled old mechanics who take great pride in their
rides, and they'll take the law into their own hands if
necessary.
Rodders ride to live and live to ride, preferring powerful classic
vehicles
to the sinister machines of the Enforcers or the brutal creations of
the
Red Death. Many a crazed marauder has mistaken a pack of
Rodders
for defenseless civilians, and paid for it with their lives.
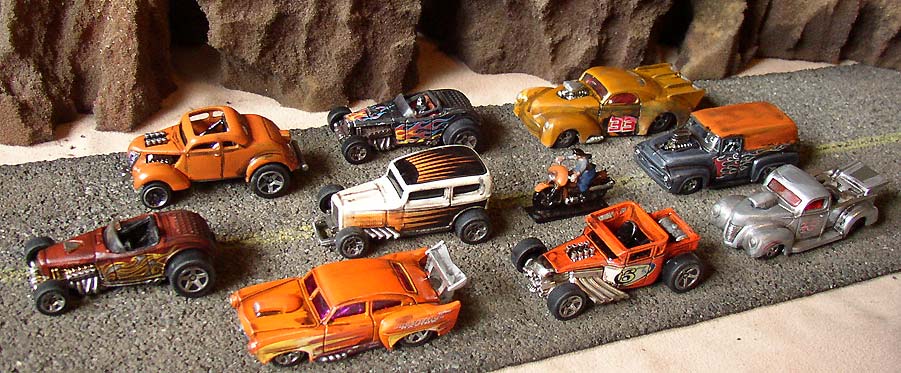
All of these vehicles are stock models! Some have been repainted
orange though, to match the rest of the vehicles.
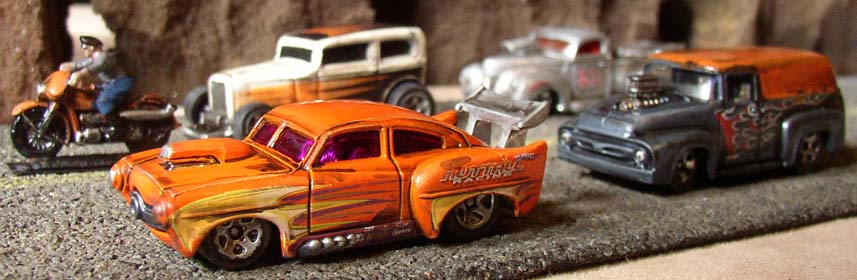
My favorite vehicle is this custom job. This was one of those
MYSTERY Hot Wheels. When Hot Wheels went on sale for half price
at
my local store, I went ahead and bought a few mystery vehicles, and was
quite pleased with what I got! I have since added some spikes to
the roof to make it even meaner looking- pics coming soon...
SURVIVALISTS
In these dark times, there are many who believe the end of the world
is not far away. Survivalists have retreated from the decaying
cities
into the lawless badlands, and have created a fleet of vehicles tough
enough
to survive the apocalypse.
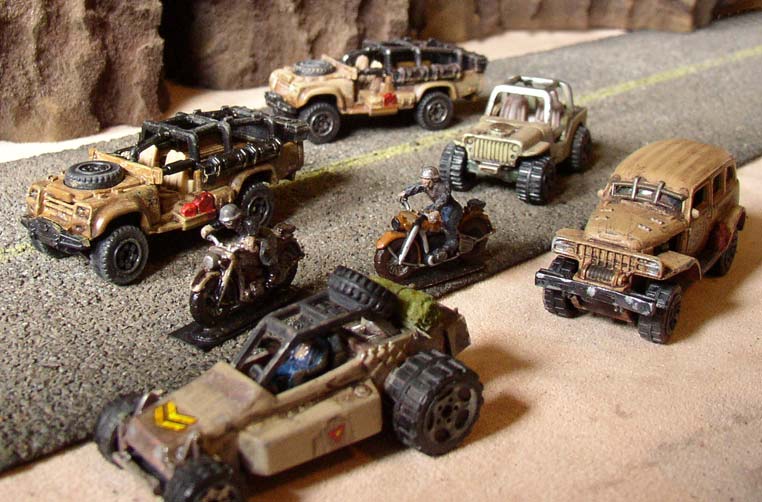
The buggy in the foreground is a converted sprint car. It has offroad
wheels from another vehicle, a tarp made of rolled up tissue paper, and
a spare tire for that offroad look. The driver is a repainted
micromachines
Greedo figure!
The truck behind it is from the Matchbox Medieval Rides set.
A window grate has been added, but otherwise this vehicle is stock,
with
just a bit of weathering (dark brown wash and silver sharpie chip
marks).
The open trucks in the back are Matchbox Sahara Survivors- totally
stock models, with just a bit of paint to grunge them up. The
Jeep
in the middle was a crazy hot rod that I stripped back down to just the
Jeep body, since it was a good size. Most jeeps are way too big
to
be in scale with other cars.
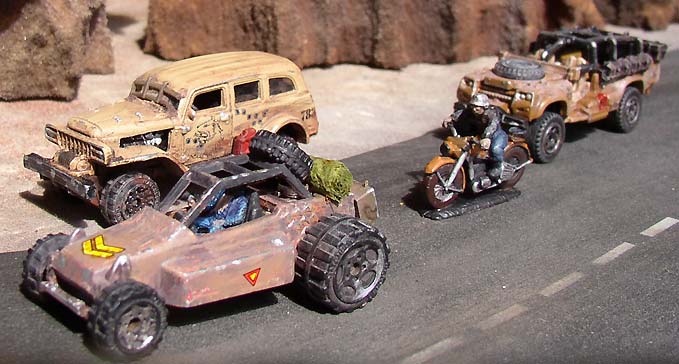
This earlier shot of the vehicles shows how tricky painting can
be.
The original Tan I used on the buggy and Sahara Survivor was way too
pink.
I mixed some white and yellow into the paint to get the better colors
for
them seen in the picture above.
LOCAL POLICE
Although the Enforcers are known and feared throughout the land, they
can't be everywhere at once. Many of the older districts still
employ their own local justice, who do whatever it takes to keep their
trusty old coupes and interceptors up and running.
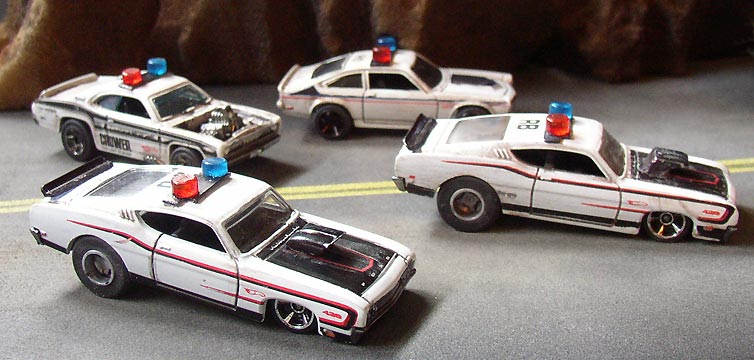
The two Muscle Cop Cars are HW '69 Ford Torino Talledegas. They came
that color! A scoop was added to the hood, a spoiler to the back
(painted black, made from a plastic razor cover), the rear wheels were
replaced, (with Lego ones), and light bars were made by cutting the
ends off of Light Bright pegs. I couldn't find any red pegs, so I used
orange ones and colored them with a red sharpie. They were
mounted onto strips of sheet lead glued to the roof.
The other two cars were also stock, and just got a light bar added, no
other modifications. The Vega had a blue stripe I blacked in with a
fine point sharpie, and the Duster came already hoodless and blown- I
just blacked in the engine compartment with some flat black enamel.
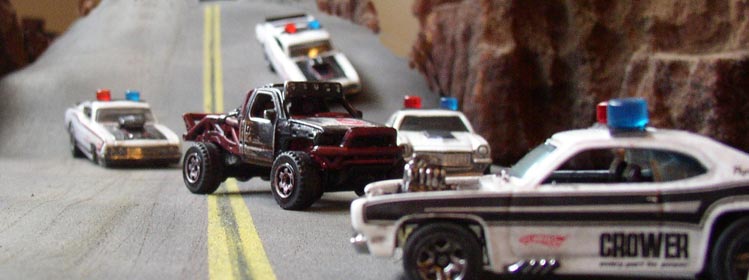
Here the locals have managed to pin down the last truck from a band of
marauders who weren't JUST passing through town...
BIKES
Finding bikes in scale with HW / MB vehicles can be tricky. The two
best options I've found so far are:
1. Old Micro Machines motorcycles. You have to go to ebay or
collector
stores to find these, they stopped making them years ago. I based up
mine
by gluing it to a brass plate, so it doesn't fall over.
2. 1/72 scale military models. Armourfast makes a set that is
reasonably
priced and perfectly scaled (more on that below).
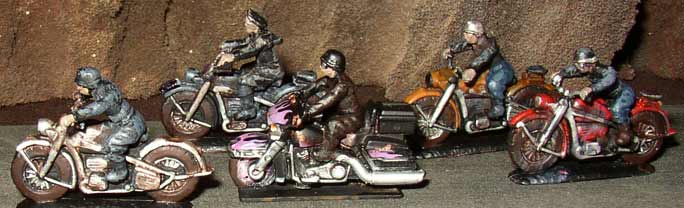
Here's a nice collection of bikes for our games. The bike in
the center is a Micro Machines motorcycle. The other four are
1/72
scale Armourfast german motorcycles! I also used a spare rider
from
the Armourfast kit to equip the Micro Machines bike with a rider, and
it
fit perfect! Pictured below is the set I purchased, for only $8
including
shipping. It comes with 6 bikes, riders, and extra figures!
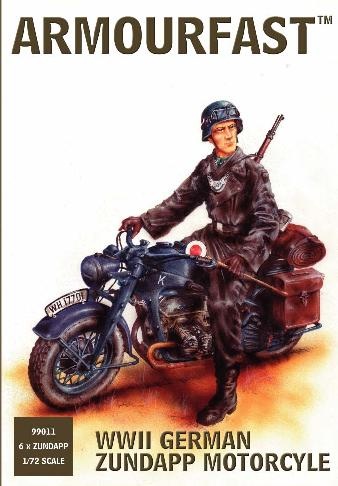
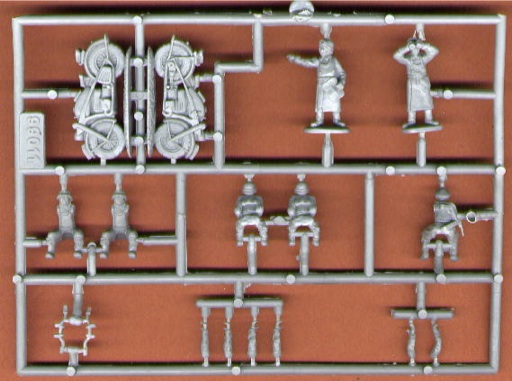
The only problem is the plastic is very rubbery (so it doesn't snap),
which means you really need to clean it with soap and water, and use
some
strong superglue to keep them together. To paint them, I primed
using
a metallic paint since the laquer base will actually dry over rubbery
plastic,
then I hit 'em again with flat black enamel primer and paint them with
enamels.
TRUCKS
You can find big rigs / tractor trailers that are a good scale if you
look around. Grab a Hot Wheels car and use it to check
scale
before you buy. Good sources include:
1. Matchbox's SUPER CONVOY series of trucks. They're only 8-10
dollars. The truck below started as one.
2. FastLane makes some decently sized trucks too, usually for around
10 dollars.
3. There are promotional trucks made for John Deere, beer companies,
etc. that are a good size, though they tend to cost more (12-18
dollars).
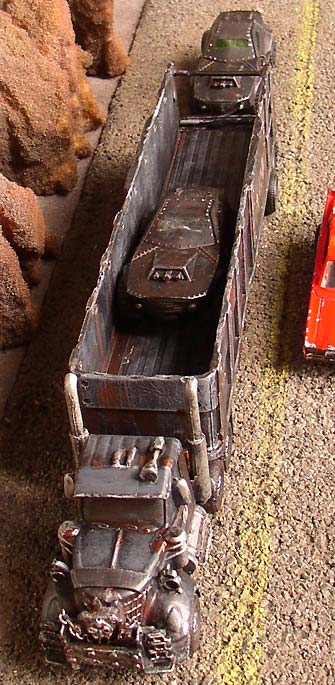
Here's my first Truck conversion. Starting with a Super Convoy
truck,
I sanded it down and built a push bar for the front. I made a visor out
of some sheet lead, and a horn out of some plastic and wire bits.
The hood and fenders were very rounded, so to make them more menacing,
I added a strip of sheet lead over the front of the hood to make it
more
square, and some small lights on top of the fenders. The trailer
was too tall, so I cut it down and drilled some holes along the top
edges
for more detail. The whole truck was distressed with a moto-tool,
primed flat black, drybrushed grey, and then detailed with silver
sharpie
and some brown washes.

The trailer is actually big enough to hold two cars! I remounted
the trailer back door with a hinge at the bottom so it could form a
ramp
for the cars to enter and exit. Also note the textured plastic
added
to the floor of the trailer to give it more detail.
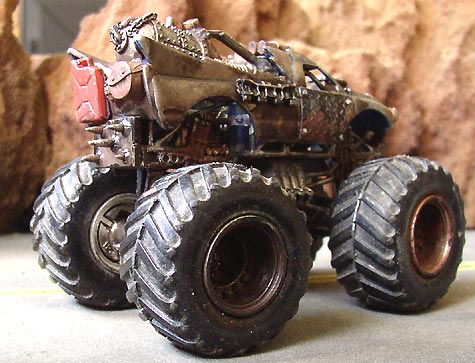
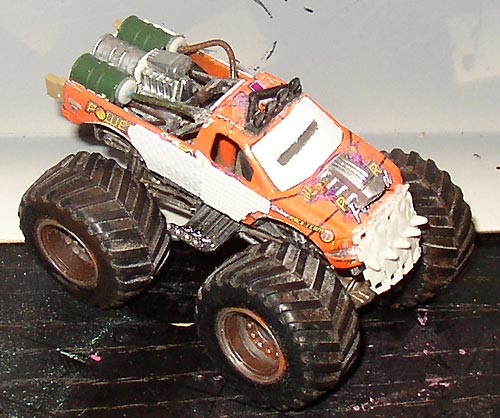
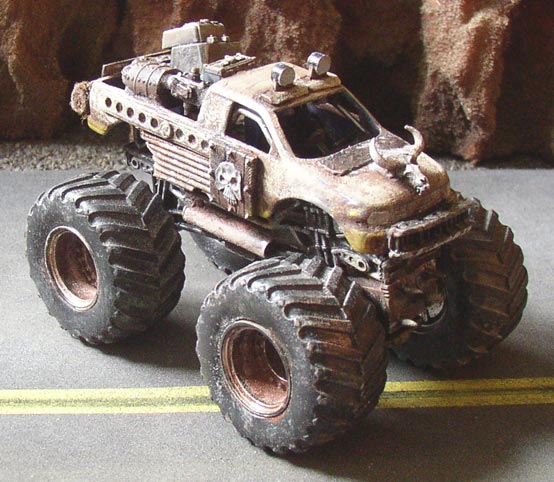
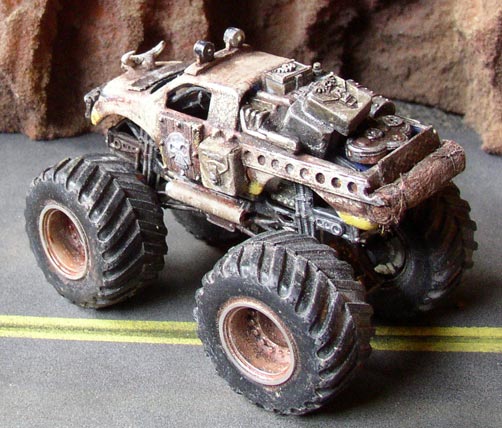
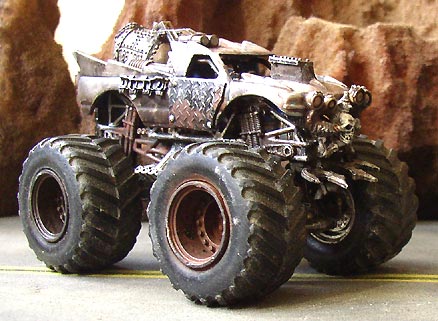
MONSTER TRUCKS
One of the special scenarios for Road
Wolf pits cars against Monster Trucks. Using
off-the-shelf monster trucks works fine, but they are even more fun to
convert than regular vehicles!
I call this one The Beast (which could double as a Red Death vehicle in a pinch).
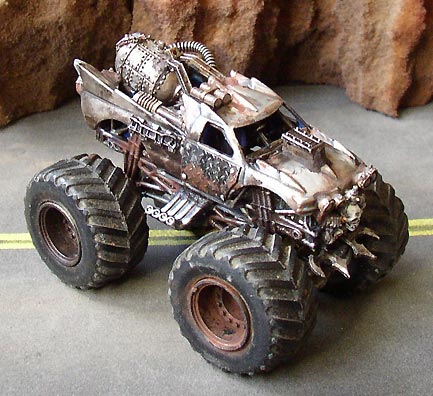
This started as a Shocker monster truck. I destroyed a moto-tool
wire brush stripping all the paint off. Then I set to gluing on all
manner of crap.
The big fuel tank in the back is from an old Ork Skorcher model. Its
lead, so it was easy to cut and bend into place. Tank parts and toy
hoses complete the details in the bed.
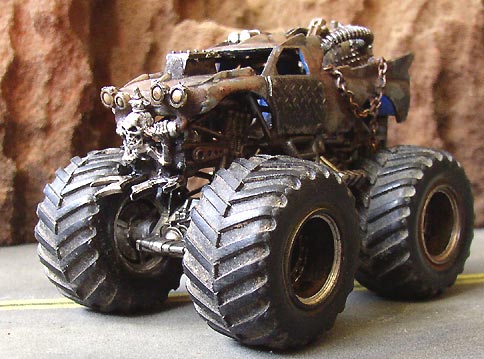
The spikes in front are from an old Gorka Morka Trakk variant kit. The
skull icon is an old banner pole from something. The headlights are
painstakingly glued onto the bumper one at a time, from some military
models. I used diamond plate plastic, tank treads, and
jewelry chain to decorate the sides. The back has some Imperial Guard
pouches and a (way too big) jerry can from some toy. The plastic
parts were painted dark brown or black and highlighted with silver
sharpie and some steel drybrushing. The rest of the truck was already a
nice base metal color, and just got plenty of brown and rust
washes. Click here for one last
view...
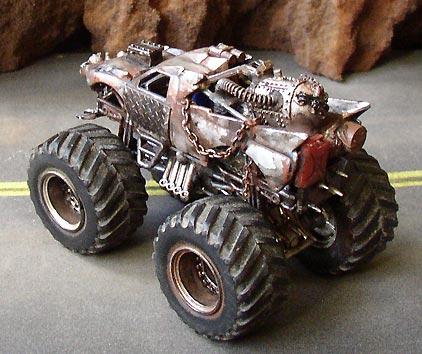
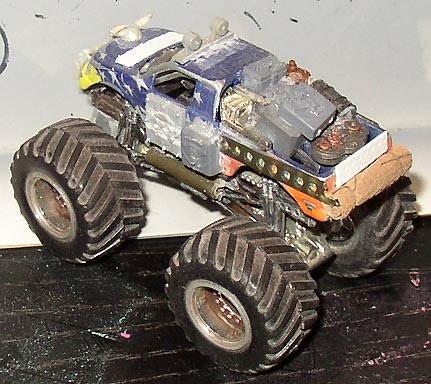
The Hot Rod (which could also be used by the Rodders):
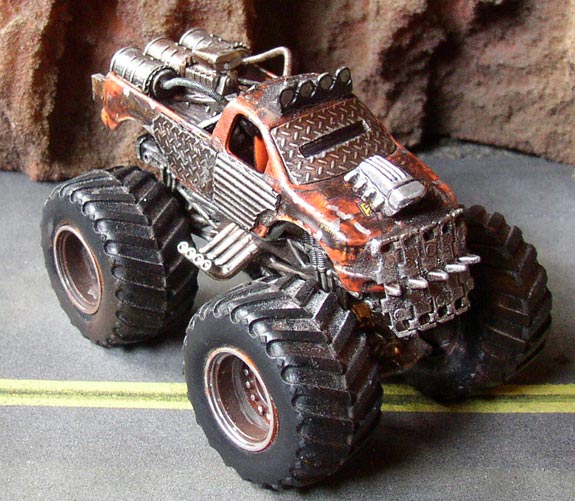
This one uses plastic fuel tank parts, tank tread, metal spring
bracelets, spare engine, roof lights, blower, and pipes from scrapped
Hot Wheels cars, and textured styrene plasticard for the side and
window armor. A rectangular hole punch came in handy for the window
slit.
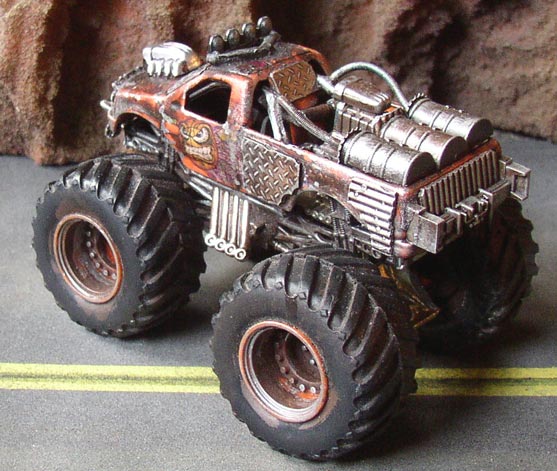
The Cowboy (which could also be used by the Survivalists):
This one uses various toy and model parts, including pouches from a GW
Ravenwing Bike sprue, Goblin shields for the door armor, and a metal
wolf skull with horns from an old skeleton sprue. The bedroll in back
is rolled up tissue paper tied with thread and coated with some glue.
The Tires are extra distressed with sandpaper.
THE
ROAD
Aside from vehicles, the main thing you need to play Road Wolf is a
road, of course! Actually, two parts: a dirt "off-road" and a
paved
road. Your dirt off-road should be 2' x 4', and the paved road
should
be 4' long and 6 to 8" wide.
Pictured here is my 8" wide road, made from a thin foam liner meant
for use inside toolboxes or on shelves. I bought a 4 foot long
roll
that was 18" wide, and cut it into strips of road with a sharp hobby
knife
and a long steel ruler. Then I sanded the road surface with
sandpaper
to lighten it, rough it up, dull it down. By sanding along the
length
of the road you can add some streaks that help convey a sense of
speed.
Then I used a dusting of flat white spray primer, very sparingly, to
lighten
it some more. To paint the double yellow lines, I masked off a
strip
in the center and spraypainted it yellow, then using a black sharpie
and
a straight edge, I inked in a black line to make the strip into two
stripes.
Finally, to give it some color and dull it down even further, I RUBBED
IT IN THE DIRT! Yep, using some dry, sandy, dusty dirt from the
back
yard, I got a very convincing finish on the road.
The off-road is a piece of heavy upholstery cloth. I started
with
a dark brown color, and used white spraypaint to lighten it up a
bit.
I then used shredded foam rubber sponges to paint on various shades of
brown, tan and grey in blotchy patterns. Then I rubbed the whole
cloth in the DIRT! The dirt roughs up the cloth surface just a
bit
to add some texture. It also adds some color, evens out the
painting,
lightens it up, and dulls down any shiny bits for a more natural
finish.
Dirt for the win!
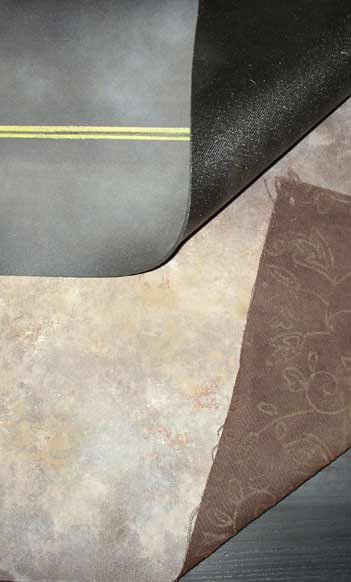
On the left is a shot of the Road material and the Off-road cloth
material
from underneath- you can see that although thin, these materials are
just
heavy enough to stay put during our games. You can also see just
how much they were lightened up with sanding, paints, and dirt rubs!
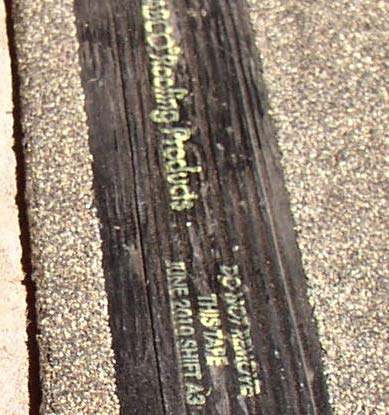
A cheap alternative to foam rubber is ASPHALT ROOF TILE. You might
have some on your roof right now! The middle picture shows the
back
of an asphalt tile- avoid getting the black tar strip hot or it will
become
very sticky. Roof tiles are usually 3 feet long, with
three "shingle" tabs sticking out - to make them into road sections,
just
cut these off with a heavy duty knife or some old scissors. Try
to
get black tiles (if they are grey or taupe, you can spraypaint them
with
flat black first). Then rub them down with some dirt to
give
them a warmer, lighter color. The last picture shows the foam
rubber
road on the left, and some asphalt tile on the right that has been dirt
rubbed and had yellow stripes spraypainted on. It looks
pretty
good! However, asphalt tile is brittle, so it can't be
rolled
up like the foam rubber can.
Back to Road Wolf
Back to Necromundicon