Following are rules for the different realms encountered during the course of a Chaos Campaign, and scenarios to play in the course of each environment. Try playing through these scenarios in order to capture the feel of a world falling into decay and madness...
![]()
The Realm of Man
Even before the coming of Chaos, the decline
of mankind leaves its mark.
![]()
![]() BETRAYAL
BETRAYAL
![]()
"No enemy blow hurts more then that struck by a former comrade."
For the first game, players play the roles of troops and civilians on an Imperial world in the grip of civil war. Suppressors and militia ruthlessly hunt renegades in the streets. Adepts fawn over their heritage and try to save works from heedless destruction. Flagellants warn of the coming doom and dole punishment out to themselves and others. Each players warband represents of a squad of troops, trying to supress uprisings and salvage supplies. But soon they find their own kind begin to turn against them... Will anyone survive this plague of madness?
Players may field an additional 9 Favor worth of Troops for this game ONLY. These extra troops may not be kept after the game!
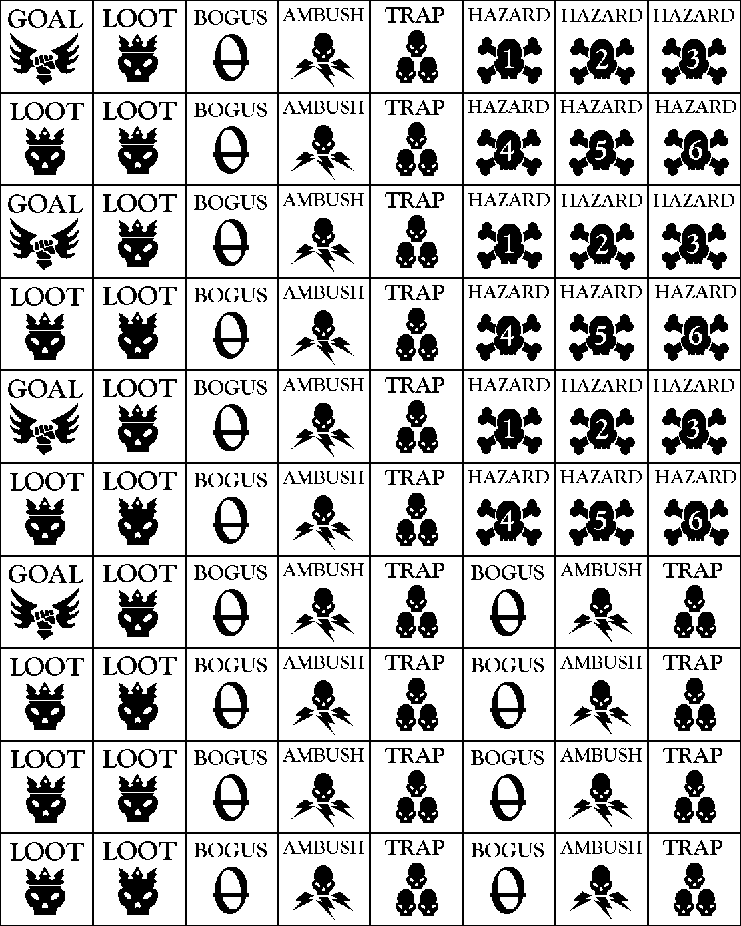
SETUP: Use Explorator blips for this game. Put out 15 random blips per player. Treat goal blips as loot.
AMBUSH: Roll a red die to see what kind of HERETIC you have uncovered.
0= trooper. 1-2= fanatic. 3=Specialist.
| ENEMY | M | A | H | Melee | Ranged |
| Trooper | 6 | 1 | 1 | ooo W | ooo W J (autogun) |
| Fanatic | 6 | 0 | 1 | OOOO W | -- Frenzy, Charge |
| Specialist | 6 | 1 | 1 | ooo W | OO: Flamer ( FT Burn W X) / Plasma ( Line W J) / H. Stubber (* Rap S J) |
TRAP: Boobytrap! Roll OO W vs. Melee (may parry, may not reroll). Remove after it goes off.
HAZARD: Civil war has left the world in a dangerous state.
1-2. CORPSES. o S IA (stench, revulsion, infection.)
3-4. DEBRIS. O W vs. armor (broken glass, rubble).
5-6. FIRE. O W IA (fireboming, ruptured gas lines).
LOOT: 1 action to pick up. Model collecting the loot also gains +1 TRAITOR token.
SPECIAL: HOLD IT TOGETHER! One member of your warband (should be your champion if you have one) may remove 2 TRAITOR tokens from an adjacent model as an action.
SPECIAL: BETRAYAL. At the end of each enemy turn, roll 1 white die per model, including the Sergeant!. Add that many TRAITOR tokens to the model. If they acquire 3 tokens, they become a TRAITOR: remove 1 wound, and immediately attack their own nearest squad member! Have another player run the Traitor, and treat them as an enemy model from then on. Anyone from any squad may attack a traitor.
REWARDS: Earn 2 pips for each trooper or fanatic killed. Earn
3 pips for each specialist killed. Earn 4 pips for each Sergeant
killed. Double the pips earned if the killed model is a Traitor!
Earn +1 Favor for every loot collected.
(Game ends when all blips are resolved or all loyal forces have been
killed).
![]() PERSECUTION
PERSECUTION
![]()
"Better to kill a hundred innocents than let one heretic live."
The Inquisition has ruled that your sector is corrupted beyond repair, and sends Arbites and Sororitas Purgation squads to cleanse everyone, innocent or not! To complicate things, ungrateful Renegade locals will give your position away, if not kill you outright, for invading their territory. If you hope to survive, you must keep your head down and find the exit before you are purged...
Players may take an additional 6 Favor worth of Troops for this game ONLY. These troops may not be kept after the game!
SETUP: Players all start on one long side of the board. Purgators also enter from this starting side of the board! Place terrain representing the EVACUATION SUMP in the center of the far edge of the board. Use Explorator blips for this game. Put out 15 random blips per player, and three goal blips (representing generators), at least 6" away from the starting edge.
HIDING: Any player model may hide by spending an action. Purifiers and Hunters may not move towards or attack hidden models. Hounds and Renegades CAN move towards and attack hidden models! REVEALING: If an enemy moves within 1" of you, you lose your hidden status. If you fire a gun, you lose your hidden status. If you melee an enemy and fail to kill them, you lose your hidden status!
YELLING: A player model or a Renegade may reveal a hidden model within
6" by yelling. This takes no action, but reveals the yelling
model too. The yelling model may still hide again after yelling by
spending an action.
---------------------------------------------------------------
AMBUSH: Renegade. If there are no Purgators within 12",
they will attack. Otherwise, they will reveal the nearest hidden
player model by yelling, move 6" away, and then hide.
TRAP: Model is immediately revealed! Roll OOO S vs. Melee (may not parry or reroll)- max damage = ENSNARED. While ensnared, cannot move or hide! To escape, a friendly model must spend an action adjacent to the ensnared to free them. Remove after trap goes off.
GOAL: The three goal blips are GENERATORS- spend an action to turn them on, though this will reveal any hidden models within 6". Anyone can exit by moving onto the evacuation sump once all three generators are turned on.
HAZARD: Civil war has left the world in a dangerous state.
1-2. CORPSES. o S IA (stench, revulsion, infection.)
3-4. DEBRIS. O W vs. armor (broken glass, rubble).
5-6. FIRE. O W IA (fireboming, ruptured gas lines).
LOOT: 1 action to pick up.
--------------------------------------------------------------
At the start of the first enemy turn, place 1 Purifier, 3 Hunters,
and 2 Hounds PER PLAYER at the start point.
ENEMY TURN- follow these steps in order:
1. REINFORCEMENTS. At the starting edge, Add o Hounds /
player, and O Hunters / player (3= Purifier).
1. RENEGADES: if there are no Purgators within 12", they will
attack the nearest player model. Otherwise, they will attempt to
reveal the nearest player model by yelling, and will then hide.
2. HOUNDS move towards the nearest model, hidden or not, and
attack! If no hounds are present, add 1 red die of hounds per player at
the starting edge.
3. HUNTERS AND PURIFIERS move towards the nearest revealed model
and attack! Take extra move if no models are in range. If no
models are revealed, move towards the nearest sump or generator that
you are not currently on.
| ENEMY | M | A | H | Melee | Ranged | Can see Hidden? |
| Purifier | 5 | 2 | 1 | OO* | OOO Burn W X HFT / OO Rap. K X KB / OO W -- 2"B IFC | no |
| Hunter | 6 | 2 | 1 | OO* | ooo K J KB / ooo S J 1"A | no |
| Hound | 8 | 1 | 0 | OOO | Mob-2. Trot. | YES |
| Renegade | 6 | 1 | 1 | OOO* | oo K J 8" | YES |
EXIT. You must find an exit to escape the encircling Purgator squads! The first goal blip to be found is the Exit- a pneumatic sump leading to the lower levels of the city. But it can't be used until the second goal blip is found- the generator that powers the Pneumatic Sump. Spend an action adjacent to activate the Sump- then anyone that moves onto the Sump can escape!
REWARDS: Earn NO pips for killing Purgators, though it may get them
off your back. Earn 2 pips for each hit done to a renegade.
Earn 2 pips for every member you can get out the exit. Earn 5 pips
for activating a generator. Earn 1 Tribute for each loot blip collected.
(Game ends when all player forces have exited or been killed).
![]()
The Rise of
Cults
What now the fate of men whose Emperor has
abandoned them?
![]() The
rules for Aligning with Chaos powers may
be used from this point on.
The
rules for Aligning with Chaos powers may
be used from this point on.
![]()
![]() QUARANTINE
QUARANTINE
![]()
"In these dark times, a man's life has little value, yet he will cling preciously to it."
As the blood of innocents pours down through the sluices, the sewers below become the breeding ground of horrible contagions that rot the mind as well as the body. The sewers are quarantined, with automated defense turrets set up at every exit. Only authorized ID tag bearers can pass these sentinels unharmed. A research team is sent in to look for survivors and a possible cure, but are met only by hordes of violent plague-zombies. None of the researchers return, their ID tags and antivirus vials dropped along trails of blood...
ALIGNING: This scenario is NURGLE aligned.
SETUP: Place terrain to represent the sewers, and place two 6"x 6" Exit Zones, one at each end of the board, with some kind of autogun or defense turret nearby. Use Explorator blips for this game. Place 10 blips per player around the board, anywhere but in the center. All Warbands start in the middle of the board.
BOGUS: Antivirus! 1 action to pick up. As an action, bearer may remove 1 INFECTION token from self or any adjacent model (see below)- this uses up the Antivirus (discard after use).
LOOT/GOAL: You found an ID tag! 1 action to pick up (place on the model's base). The bearer may pass through the exit zone unharmed. If bearer is killed, place the ID tag on the board for anyone else to pick up. You may also give an ID tag to an adjacent model as a free action.
AMBUSH: Zombie Horde! Place O+1 Zombies adjacent- they will attack immediately! (see below).
TRAP: Survivor! The survivor clings to you, begging you to take them out of here. Unfortunately, their constant crying attracts zombies... All zombies within 12" immediately move 6" towards the survivor. The survivor will follow the closest Warband model. Survivors may be given ID tags (see Goal below). No pips are earned for killing survivors, though no one will blame you if you do... Stats for survivors appear on the enemy chart below.
HAZARD: The sewers are filthy, unkempt, and hazardous!
1-2. CORPSES. o IA Max Damage = Infected (see below).
3-4. DEBRIS. O W vs. armor. Max Damage = Wound.
5-6. SEWAGE. O W IA. Max Damage = Infected (see below).
INFECTION. At the end of the player turns (before the enemy turn), roll a WHITE die for every model on the board. Add +1 to the roll if the model is INFECTED, and +1 if the model is WOUNDED. On a 2+, the model becomes INFECTED. Multi-hit models may choose to lose 1 hit instead of becoming infected. If the model is already INFECTED and rolls a 2+, they become a ZOMBIE! Replace the model with a zombie that will attack the nearest (previously friendly) model! (but don't run them again on the enemy turn).
On the ENEMY turn:
Place OO zombies per player on the board edges that don't have exit points on them. If there is a SURVIVOR within 18" of a zombie, they will move 12" towards the survivor! Otherwise, zombies will move 6" towards the nearest warband member.
If a survivor or warband member has 3 zombies in base contact with them,
further zombies will move to the next available target. Remember,
Zombies MOB, so combine their melee dice for up to three of them that are
adjacent to their target. Zombies also "Graze", meaning if their
target isn't already wounded, they won't kill- instead, they will merely
wound, as they take bites off of them...
| ENEMY | M | A | H | Melee | Notes |
| Survivor | 6 | 0 | 1 | oo S parry | Attracts Zombies. Moves toward nearest Warband Member. |
| Zombie | 6 / 12 | 1 | 0 | OO W | Plague: (wounds on a tie). Grazing: will only Wound an unwounded target. |
EXIT: SENTRY GUNS. Any model that moves into an exit zone that is not carrying an ID tag will be immediately SHOT by the sentry guns: OOO W KB.
REWARDS: For every model of yours (or tag-along survivor!) that
moves through an exit zone and exits the board, earn 1 Tribute.
Earn half a pip for every zombie you kill- remember to deduct casualties
from your Favor roll!
![]() BURNING BLOOD
BURNING BLOOD
![]()
"Let the planet burn!"
As the warbands return to the surface, riot fires blaze out of control. Those insane enough to remain include escaped prisoners, murderers and madmen whose only goal is slaughter. Can your warband stagger through the blood and smoke to find their way home?
ALIGNING: This scenario is KHORNE aligned.
SETUP: Set up urban ruins terrain (try flicker bulbs or tea lights for fire fx!). Use Explorator blips for this game. Place 20 blips per player, approximately 6" apart from each other. Warbands start in a corner, and must reach the OPPOSITE corner to escape.
SMOKE: The board is covered in a choking fog of smoke. -1 to hit targets that are not adjacent.
OFF THE PATH: Models that end a move (or extra move) NOT touching a blip must roll a d6 on the hazard chart below! Also, models off the path are more susceptible to attacks from Maniacs (see Enemy Turn below).
MISTAKEN IDENTITY: If you move next to a model belonging to another warband, roll a white die: on a 1 or 2, that model will assume you are a maniac, and must attack you in melee! Neither party can earn pips from the resulting melee unless they have aligned with a chaos power already, so it is recommended that you parry...
HAZARDS
1-2. COLLAPSE. O S
3-4. TOXIC SMOKE. O W IA.
5-6. FIRESTORM. OO W
PERSONAL THREAT: Hazards only affect models touching it
(no area effect). KNOWN THREAT: Once revealed, hazards
are at a -1.
BOGUS: Leave the blip on the board- it now forms part of the
safe path!
TRAP: Your model may not move any further this turn.
Worse yet, the trap blip is removed, leaving you off the path!
LOOT/GOAL: As loot, but once you pick it up, you are no
longer standing on a blip...
AMBUSH: You are attacked in melee by a Maniac! (See
ENEMY chart below). Once the attack is over, the Maniac will move
6" into the smoke (away from revealed blips). If a Maniac has already
ambushed the Warband and is still on the board, move the existing Maniac
to the new ambush location, no matter how far away it is! Leave the
Ambush blip on the board- it forms part of the safe path.
On the ENEMY turn: For each warband, check for a MANIAC ATTACK.
Working from the front of the warband to the back, roll a red die for each
model. If a maniac that was revealed by that warband is still on the
board, add +1 to the roll. Also, if the model is NOT standing
on a blip, add +1 to the roll. On a roll of 3+,
place the MANIAC next to the victim(s)! (If a maniac is already on
the board, move them to the new location, regardless of how far away it
is, otherwise place a new one). They will then attack the victim
(or multiple adjacent victims, if possible) in melee, and will then move
6" into cover if possible (in addition to the smoke penalty). Note
that once the Maniac has attacked, no further checks are to be made for
that warband until the next enemy turn.
| ENEMY | M | A | H | Melee | Special: |
| Maniac | 6 | 1 | 1 | OOO OOO | Frenzy, Scythe, Trophy Collector. |
EXIT: To escape this hell, warbands must exit off the OPPOSITE corner of the board from their starting corner!
REWARDS: Earn Tribute from Loot as normal. Earn double pips for
hits on Maniacs, and triple pips for an attack that kills them!
![]() DISTORTION
DISTORTION
![]()
"Everything you know is a lie."
Even the surface is in turmoil. The skies fill with sickening colors, the air crackles with unnatural energy, and nothing is quite as it seems...
ALIGNING: This scenario is TZEENTCH aligned.
SETUP: Set up any kind of terrain you like, with occasional bits of Chaos scenery. Use Explorator blips for this game. Place 15 blips per player, approximately 6" apart from each other. Warbands start in a corner.
ALL HAZARDS: WARP CORRUSCATION.
Roll OO - your Armor.
0- Nothing Happens.
1- WARP to any other revealed hazard blip. If none available,
you are LOST in the warp until the next hazard blip is revealed- you will
reappear there, and must roll for the new hazard as well!
2- CRYSTALLIZE- You are turned into a WARPSTONE! Replace your
model with a Warpstone marker (see Loot below).
3+ TRANSMORPH- You turn into a WARP CREATURE! (see Ambush below.
NOTE- you may be able to return to normal...)
LOOT/GOAL: WARPSTONE. When picked up, roll on the
Hazard chart above, -1 to the roll. Worth o+1 Tribute at end of game.
TRAP: Roll OO vs. Armor. If killed, roll
on the Hazard chart instead!
AMBUSH: REPLACE your model with a Warp Creature!
| ENEMY | M | A | H | Ranged | Melee | Special: |
| Warp Creature | 6 | 2 | 1 | OO W FT | OOO | If beast is stunned, treat as WOUNDED instead. Kill= Roll on Hazard chart above for the victim instead! |
BOGUS: MEMOIR. 1 action to pick up. When rolling for Enemy Reversion on the enemy turn, add +o to your roll if a model carrying a memoir is within 6".
REWARDS: WARPSTONE is worth o+1 Tribute each. Earn +1 pip for
each Warp Creature killed. Earn +5 pips for each Transmorphed member
that returns to normal!
![]() THE BAZAAR
THE BAZAAR
![]()
"You won't ever want to leave..."
As the future becomes more horrifying and uncertain, survivors are even willing to trade crucial supplies- or even grisly trophies- for a few hours diversion. But can they avoid becoming a permanent victim of the pleasures within?
ALIGNING: This scenario is SLAANESH aligned.
SETUP: Set up terrain with a large, central TENT or BUILDING in the middle to represent the Bazaar. If you have a suitably large and disturbing looking model to represent the AMALGM, place it inside the Bazaar.. Use Explorator blips for this game. Place 15 blips per player, approximately 6" apart from each other. Place two SUPPLY markers per player inside the Bazaar. Warbands start in a corner.
HAZARD: Social Decay has left the world in a dangerous state.
1-2. DEFILED CORPSES. o S IA (stench, revulsion, infection.)
3-4. DEBRIS. O W vs. armor (broken glass, rubble).
5-6. FIRE. O W IA (fireboming, ruptured gas lines).
TRAP: A taste of Pleasure... Roll O vs. Armor. Graze = stun. Kill = ADDICTED (see BAZAAR result #1 below).
LOOT/GOAL: TROPHY. May enter the Bazaar by trading in a trophy.
AMBUSH: An Addicted ambushes you, hoping to collect a trophy!
| ENEMY | M | A | H | Melee | Special: |
| ADDICTED | 6 | 0 | 1 | OOO W | Ignore FX of wounds. Kill = wound instead (take trophy). Once they wound, will disappear (runs off with trophy). If you kill them, earn a trophy! |
| AMALGM | 0 | 2 | 4 | OOOOO
SCYTHE |
Will attack ALL HOSTILE models inside the Bazaar on the enemy turn, from weakest to strongest. Earn 3 pips / hit done to the Amalgm. |
BAZAAR: Until the Amalgm is killed, you must give up a TROPHY to enter the BAZAAR. Then, make a WILLPOWER test-- roll one white / base Favor cost (so typically ooo) and consult the following chart:
0: SUBSUMED. You have been overpowered by the temptations inside.
Your model becomes part of the AMALGM: add the model's hits to the Amalgm's,
and place an additional SUPPLY token anywhere in the Bazaar.
1: ADDICTED. You have had a taste of temptation, and must
have more. Your character will attack the nearest model in melee,
friend or foe, until they earn a Trophy (by wounding the model)!
Then they must turn it in at the Bazaar.
2: DISGUSTED. You are so horrified by the AMALGM, you must try
to destroy it! Mark your model as HOSTILE.
3+: RESISTANT. You may do as you please this turn, including collecting
SUPPLIES (1 action). If you are inside the Bazaar at the end of
your next turn, you must roll on the chart again! If you choose
to ATTACK the Amalgm, you must mark your model as HOSTILE.
If the Amalgm is killed, anyone may enter the Bazaar and spend an action
to pick up a Supply token.
Anyone who attempts to enter the BAZAAR without a trophy while the
Amalgm is still alive will automatically become ADDICTED.
REWARDS: Earn 1 Tribute for each Supply marker collected. Earn
3 pips / hit done on the Amalgm. Warband that aligns with Slaanesh:
earn +5 pips for each member Subsumed!
GAME END: Game ends once all the warbands have been killed or Subsumed,
OR if the Amalgm has been killed and all of the supply tokens have been
collected.
![]()
The Chaos Wastes
The world decays to madness as the dark
energies of chaos creep in.
![]() The
rules for Daemons may be used from this
point on.
The
rules for Daemons may be used from this
point on.
![]()
Use the following rules for blips unless otherwise
noted by the scenario.
![]() BOGUS-
Nothing happens. Remove blip when revealed.
BOGUS-
Nothing happens. Remove blip when revealed.
![]() CHARNEL-
You must spend an action to pick it up, and cannot perform any action while
carrying it. It takes no actions to drop a CHARNEL. If you can drop it
off the board or on your vehicle, or are carrying it when the fight ends,
you have earned it!
CHARNEL-
You must spend an action to pick it up, and cannot perform any action while
carrying it. It takes no actions to drop a CHARNEL. If you can drop it
off the board or on your vehicle, or are carrying it when the fight ends,
you have earned it!
![]() WARPSTONE-
To pick up, spend an action and roll OO VS. armor. Max. damage
= stun, warpstone dropped, unless a 6 is rolled, at which point the model
immediately turns into a Chaos Spawn and the warpstone is dropped.
Once picked up successfully, you have earned it!
WARPSTONE-
To pick up, spend an action and roll OO VS. armor. Max. damage
= stun, warpstone dropped, unless a 6 is rolled, at which point the model
immediately turns into a Chaos Spawn and the warpstone is dropped.
Once picked up successfully, you have earned it!
![]() TRAP-
VORTEX. Roll OO W vs. Armor. If model would be killed by the
roll, then model takes no damage but is removed from table, will re-appear
at location of next Ambush blip revealed instead of an Ambush (may not
ambush). If no other Ambush blips are found before game ends, treat
model as KOed. Models that are Big or Heavy will not get sucked into
a vortex- they are simply killed instead. Remove trap after it
goes off.
TRAP-
VORTEX. Roll OO W vs. Armor. If model would be killed by the
roll, then model takes no damage but is removed from table, will re-appear
at location of next Ambush blip revealed instead of an Ambush (may not
ambush). If no other Ambush blips are found before game ends, treat
model as KOed. Models that are Big or Heavy will not get sucked into
a vortex- they are simply killed instead. Remove trap after it
goes off.
![]() HAZARD-
Note that all hazards have a permanent 3" area effect. If you start inside
the area and move out, you will not be affected. If you move into or stay
in the area, you will be affected unless KOed or dead. You will be affected
as described on the chart below. ALIGNED: if you take damage from
a hazard of your alignment, earn 3 pips. This only applies when the
hazard is first revealed.
HAZARD-
Note that all hazards have a permanent 3" area effect. If you start inside
the area and move out, you will not be affected. If you move into or stay
in the area, you will be affected unless KOed or dead. You will be affected
as described on the chart below. ALIGNED: if you take damage from
a hazard of your alignment, earn 3 pips. This only applies when the
hazard is first revealed.
1: Cursed. Add +1 to the next trap, hazard or enemy
attack you encounter. (Unaligned)
2. Jagged. Roll ooo W vs. armor. (Khorne)
3: Infested. Roll OOO W Plague vs.
melee. (Nurgle)
4: Warped. Roll o W ignores armor. (Tzeench)
5: Drugged. Roll O S ignores armor. (Slaanesh)
6: Coruscation. You are moved OOOOOO" in
a random direction, as KB.
AMBUSH: Will attack immediately upon being discovered, then take a half move. If still alive during the "enemy" turn, may move and attack as normal. Ambushers may ignore all hazards and other Ambushers.
Remember that to earn DARK KNOWLEDGE, you must field unknown daemon types as your ambushes (so you can kill them to earn knowledge). Otherwise, field one of these enemy types.
| ENEMY | M | A | H | Melee | Notes |
| Chaos Spawn | 4+OO | 1 | 3 | OOOOOO | Frenzy, Death Throes, Transmute, Shamble |
| Renegade | 6 | 2 | 1 | OOO+1 W | Bolter (oo K X KB Rap) |
SPIKES:Most chaos scenery is covered
in spikes. If you attempt to move a model past spikes with less than a
1" gap between them, you may be injured. Roll OO for the spikes:
if it rolls anything, roll your melee vs. the spike's roll (as melee).
You may NOT Parry or Reroll, but +P weapons count vs. spikes. Lose = end
movement before the spikes (max damage = wound). Tie= end movement
past the spikes. Win= continue moving. Spikes are only
destroyed if the scenery they are attached to is destroyed.
![]() XXX SCENARIO
XXX SCENARIO
![]()
"Quote"
Summary paragraph
SETUP:
AMBUSH:
TRAP:
HAZARD: Civil war has left the world in a dangerous state.
1-2. CORPSES. o S IA (stench, revulsion, infection.)
3-4. DEBRIS. O W vs. armor (broken glass, rubble).
5-6. FIRE. O W IA (fireboming, ruptured gas lines).
LOOT:
On the ENEMY turn:
| ENEMY | M | A | H | Melee | Ranged | Notes |
| Renegade | 6 | 1 | 1 | OOO* | oo K J 8" |
EXIT:
REWARDS:
 HUNT HUNT
Hunting is a popular sport on a Daemon World, and capturing the prey alive makes it even more rewarding.. SETUP: Put out 3 ambush blips per player, plus 5 random blips per player. SPECIAL: When an ambush blip is revealed, roll a white die and add 1: place that many ambushing beasts!
Cornered: Beasts add +1 to their melee when defending! (they do NOT parry). Pips: hits on a beast earn chaos pips as normal. SPECIAL: CAPTURE. Beasts must be KOed to be captured. Whoever KOs them gets the credit- they do not need to be carried. GOAL: Earn o worth of gold for each beast captured. (Game ends when all blips are resolved).
|
|
RAZE
Local Renegade activity can be reduced by destroying their hideouts... SETUP: Place lots of buildings- at least 2 per warband. Place 3 blips per warband anywhere but inside a building. Clearly establish which terrain counts as a building (and is thus eligible for destruction). SPECIAL: BUILDINGS. The typical building
should have armor 2, 7 hits (indicate any that have different values due
to massive size, composition, etc.)
REWARDS: Earn 3 chaos pips for each building destroyed. Collect goods from the ruins. (Battle ends when all buildings destroyed and all blips resolved). |
| CROSSROAD
You've found a burial ground in enemy territory that is rich with chaos-rich charnel, but you'll have to cross your enemy's path to get it out... SETUP: Place 6 random blips per player. Treat all bogus blips as CHARNEL. If the table isn't square, start on any board edge that faces across the short width of the table. SPECIAL: You must drop your Charnel off the board edge OPPOSITE the one you started on. REWARDS: Each charnel you get off the opposite board edge is worth 1 white die of exp. in addition to any gold earned. (Game ends when all blips are resolved).
|
| STRONGHOLD
A stronghold of renegades has been discovered deep in the wastes, under the leadership of a powerful renegade Sorceror. Warbands that can capture the renegades could persuade them to join, and the Sorceror could be a good source of Warpstone if captured... SETUP: Place plenty of high ground. Place 5 blips per player, at least 6" away from the nearest board edge. SPECIAL: Treat bogus blips as ambushers.
All ambush blips at ground level are Chaos Spawn.
CAPTURE: If you can KO or CONTROL a model, treat them as captured. Remove captured model from the board unless noted below. REWARDS: Hits on the Sorceror are worth
DOUBLE pips.
(Battle ends when all blips and renegades are resolved). |
| POSESSED
A bleak wasteland is inhabited by daemon spirits banished to the warp. All they need is to find new hosts... SETUP: Place 6 blips per player anywhere on the board. Get a pile of zombie, marine and spawn models ready too.... AMBUSH: Ambushers are Undead Marines (see below for stats).
SPECIAL: DEAD BODIES. When a model (not a daemon) is killed or KOed, leave them on the board, face down, even enemy models! If the body is not destroyed, it may become posessed during the enemy turn! To destroy a body, one of your troops (not a daemon) must spend an action adjacent to the body. Models equipped with the following weapon types: Flamer, Plasma, Melta- may automatically destroy all adjacent bodies for free, once per turn (they must roll once for fail / ration checks though). NOTE: Daemons never turn into dead bodies- they turn immaterial when killed or KOed and are removed from the board. WEAKENED HOST: At the start of the "enemy" turn, roll a red die for all WOUNDED models to represent their struggle with daemon spirits. 0=FEND OFF: Nothing happens. 1= LAPSE: If there is a model within 3" of the wounded, whether friend or foe, they will shoot it or move and melee it, and won't pull back in melee! 2= SUCCUMB: Model dies! Place face down (daemons are simply removed.). 3= POSESSED: Model is removed (treat as killed), replaced (as noted below). NOTE: Daemons are susceptible to Lapse and Posessed results! UNDEAD HOST: At the start of the "enemy" turn, roll a red die for all DEAD BODIES on the board. 0= INVIOLATE: Remove from the board. 1= RESISTANT: Leave on board, check again next turn. 2-3 = POSESSED: Model is removed, replaced (see below). POSESSION CHART
REWARDS: If any of your forces are wounded
but survive the game, earn +1 Experience.
|
| WARPSTORM
Violent warp storms send burning chunks of warpstone raining down from the sky above... SETUP: Place 8 blips per player anywhere on the board. SPECIAL: DUST STORM: When firing at targets over 1" away, subtract 1 from your die roll. FLYING is prohibited this game! WIND: At the end of each warband's turn, roll a deviation die to tetermine WIND DIRECTION. If you can get next to cover such that you are downwind of the cover, or can get inside a building, you may add 1 to your armor vs. wind. Ambushers ignore wind! For each model in that warband, roll 2 White dice- if greater than your armor, move the model their base move -3" in the direction of the wind (as KB, even vs. models that ignore KB). Any models blown off a board edge are treated as KOed. HAIL: Any time you find a Bogus, Trap, or Warpstone blip, remove
the blip from play and roll a Red Die +1, vs. armor. (add
+1 to your armor if under a bridge, roof, catwalk, etc). Graze
= stun. Any damage greater than a stun is treated as IN THE WARP
instead (see TRAP rules for details).
HOARD: Charnel blips are accompanied by an AMBUSH also (as Ambush blip). This includes the possibility of models coming out of the warp! REWARDS: All charnel is worth at least 1 tribute. Earn warpstone as normal. (Battle ends when all blips resolved). |
| FIRESTORM
Daemonic fire is tearing through the Charnel Houses. Can you collect the goods before they are burned to a crisp? SETUP: Place as many large buildings as possible. It's very important to know whether you are inside a building or not, so clear this up before starting! (For example, if buildings are based up, being on the base can count as being in). Pull out all the bogus blips, then make a pile of at least 4 blips per building, and mix in one bogus blip per pile. Place the blips in their buildings. Large buildings should have more blips than small ones, but no more than 7 blips per building please! SPECIAL: DARKNESS. Due to the thick smoke, the entire board is treated as in Darkness (as cover). BOGUS: Do not remove bogus blips
when found- leave them face up as potential exits (see Ambush below).
AMBUSH: FIRE SPAWN. Use
the stats below. A fire spawn will not leave the building it is discovered
in. It will melee the closest model in the building in an attempt
to trap them inside (by stunning them). If it cannot
melee any models, it will shoot at the nearest model instead. Note
that they have 0 hits- this means any graze will kill them (assuming you
get past their armor or melee...)
SMOKE AND FIRE: At the
end of each turn, roll a red die and a white die for each model inside
a building:
REWARDS: To clear a building, reveal the last blip in the building. Earn 1 Exp. for every 2 buildings cleared (round up). Each Charnel blip collected is worth a minimum of 1 Tribute. (Game ends when all blips resolved). |
| DARKNESS
Darkness comes over the chaos wastes. The paths dissapear. And then the night hunters come... SETUP: Place 7 blips per player, in places likely to be an exit off the board. Make sure at least 1 bogus blip is in there. Make a set of Lottery tokens. Cardboard chits work well- take two and write a "1" on them, another two with "2" on them, etc. until you have enough to give each player 2 unique numbers. Take all the tokens that have numbers matching all those held by players and put them in a box to draw upon later. Use what you like for your ambushers (they don't need to be tough to be a threat), but make sure you have a LOT of models whatever they are. Renegades are a good choice, or try beasts (below).
SPECIAL: DARKNESS. All models are treated as having cover, even if out in the open. LET ME OUT! Each time a bogus blip is found, roll 2 red dice. The number you must roll to find an exit depends on the number of models left in your warband.... 4+ models: 6. 3 models: 5. 2 models: 4. 1 model: 3. If not an exit, leave the blip there. Once all the blips have been revealed, if the exit has not been found yet, you may spend an action adjacent to any bogus blip to attempt to find an exit again. You may only leave the board by spending a full move adjacent to an exit. LOTTERY OF DOOM: Any enemies still alive at the beginning of the enemy turn should be taken off the table and added to an "enemy pool". Any grazes or hits on the ambusher are removed when they are placed in the pool! If there are no ambushers in the pool, add 2 white dice worth of ambushers to the pool at the start of the enemy turn. Now, draw one lottery number for each ambusher in the pool. Whoever has the corresponding number will be attacked by the ambusher. Have the player to their left place and run the ambusher however they see fit, as long as they only attack members of that band. PASS THE BUCK: If you kill an ambusher, you must give one of your lottery tokens to any other player you choose! Yes, this increases their chances of being attacked by an ambusher. You may not give away your last token- you should always have at least one, unless you get all your surviving members out- at that point, you must give away all your remaining tokens! REWARDS: Find any exits: +1 Favor. Get any of your members out: +1 Favor (Game ends when all models have exited or been killed).
|
| ASCENT
Iron Warriors Chaos Marines have control of a teleporter device that can get the warbands off the daemon world and on a Black Crusade. But they won't give it up without a fight... SETUP: Place defensive terrain (trenches, castles, fortifications) on the board, with a tower at the back to represent the Teleporter device. Whichever warband is furthest ahead (in total points) should volunteer to run the Iron Warriors instead of playing their own warband. Place models to represent the Iron Warriors in strategic positions all over the board. They start hidden. Use enough models to roughly equal the attacking forces' points totals:
SPECIAL: Iron Warriors go last. To activate teleporter, must be at the top of the tower. Spend an action and roll 2 red dice: a roll of 3 or more will activate the teleporter. Once on, any models that move to the top of the tower will escape via the teleporter. REWARDS: +2 Tribute for activating the teleporter. +1 Favor for getting all your surviving models through the teleporter. (Game ends when all Iron Warriors are killed, or when all player models
are killed or have escaped through the teleporter.).
|
| CLEANSE
The Warbands have managed to appropriate a Space Hulk- only to discover it is already inhabited... SETUP: Use Space Hulk boards, or dense industrial terrain to represent the hulk. Place 8 blips per player. SPECIAL: May not summon Greater Daemons this game. Blips work as follows: BOGUS: O+1 Hybrids ambush
HAZARD 1-2: Power Lines- OO vs. Armor, Stun, Kill=KO
REWARDS: Charnel: worth a minimum of 1 tribute. (Game ends when all blips are resolved).
|
| HOLD
Warbands vie for control of the Space Hulk. SETUP: Place an objective structure such as an engine room or a bridge in the middle of a Space Hulk board. Place "hold" tokens on the objective. # of tokens to place= 1.5 x the number of players (round up). Define one 8" width of board edge as an "entry point" per player. Roll off for choice of start points. SPECIAL: May not summon Greater Daemons this game.
REWARDS: each hold token taken is worth 1 Tribute. (Game ends when all Hold tokens have been taken).
|
| RAID
Warbands infiltrate an Imperial city to gather slaves. But the supposedly defenseless city is now crawling with Arbites, trying to suppress a rebellion! SETUP: Place lots of Imperial terrain. Place 10 blips per player. Players may start on any board edge. SPECIAL: May NOT earn pips off of civilians or cultists!
TIME LIMIT: More Arbites are on their way, so reveal those civilians before it's too late! At the beginning of turn FIVE, treat all WARPSTONE blips found as Ambushes for rest of game. At the beginning of turn SEVEN, treat all CHARNEL blips as Ambushes for rest of game. BLIPS: All blips have variant rules, listed below. Stats for all models can be found below. BOGUS: SNIPER! Place a sniper model anywhere in LOS of
the blip. May immediately fire at revealer (as ambush). Will
stay in play until killed or another Ambush blip found (max 1 sniper on
the board at a time).
CHARNEL: CIVILIANS! O +1 Civilians ambush,
then run 9" in a random direction (use scatter die). From then on,
civilians will move 12" in a random direction. If they make it to
a board edge, they escape (remove).
HAZARD 1-2: LASER GRID. 3" A. OO S vs.
armor.
All enemy weapons Jam on a fail. Photon Grenades: OOO 3" A Burn Max. damage = stun. Sniper: Firing will not reveal hidden status. May ignore range penalties if no move. Bodyguard: Any arbites model within 3" may take all the damage from an enemy attack on you. REWARDS: For each civilian or cultist KOed, earn 1 Tribute. Earn pips off the Arbites (and other chaos forces) as normal. (Game ends when all Cultists and Civilians are resolved).
|
![]() XXX SCENARIO
XXX SCENARIO
![]()
"Quote"
Summary paragraph
SETUP:
AMBUSH:
TRAP:
HAZARD: Civil war has left the world in a dangerous state.
1-2. CORPSES. o S IA (stench, revulsion, infection.)
3-4. DEBRIS. O W vs. armor (broken glass, rubble).
5-6. FIRE. O W IA (fireboming, ruptured gas lines).
LOOT:
On the ENEMY turn:
| ENEMY | M | A | H | Melee | Ranged | Notes |
| Renegade | 6 | 1 | 1 | OOO* | oo K J 8" |
EXIT:
REWARDS:
Back to Chaos Campaign Rules
Back To Rules Crusade Command Central