![]()
Here are some quick conversion ideas- being hasty, I didn't bother
to make nice, professional how-to pictures. Hope you like 'em...
 |
PLASTIC GRENADE LAUNCHER! (See an example
here).
MATERIALS
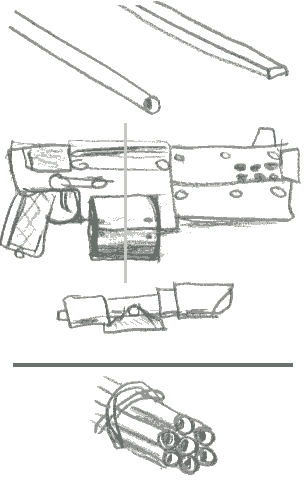
Next, cut 7 lengths of tubing, about 2" long (more if you want to make lots of these) and rubber band them together in a bundle as pictured (bottom left). Now just dab some solvent cement on the end of the bundle to glue the tubes to each other. Be sure to use styrene tubing so it glues easily (available in most hobby shops). Let the bundle DRY, then saw off a length of it about 3/8" long. Cut a length of the strip plastic the same length. Sand or file the end of the bundle if you need to so that it is flat. Now glue the bundle in between the two halves of the shoota, centering on the drum part of the shoota. You should be able to see about half of each of the pipes sticking out past the drum if you look down the front or back of the gun. Next, glue the strip plastic along the top to fill in the gap over the bundle. Finally, if you wish, you can add a scope- just glue it on top of the plastic strip. To get a space marine to hold your Grenade Launcher, use the bolter firing arms, remove the grip from the ork Shoota, open up the Marine's left hand by bending the fingers down so they fit around the fat barrel, and glue the gun in place. Ta da! One chunky, all plastic Grenade Launcher- now make
some more!
|
 |
HEAVY MISSILE LAUNCHER! (See examples here and here.) MATERIALS
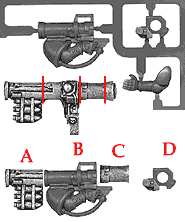
Next, Take the Launcher arrm (for part B) and the launcher end piece (for part D) off the sprue. Glue the parts together in sequence (note, part D is not shown from the side as it should be in the diagram- I'm too lazy to get the right pic). Just line everything up as seen in the examples above, and superglue in place. If you are worried about strength, drill holes down the center and pin the whole thing together with some brass wire. If you pin, drill your holes carefully so the pieces all line up nicely! Flat ends and a little fussing go a long way towards lining the parts up right- keep checking from the top and side to make sure it looks straight as you glue. You should be able to glue the completed missile launcher arm and the left arm (from the plastic sprue) onto a marine with little or no trouble. Embellish the model with additional missile ammo as you see fit. There- a missile launcher that actually looks like a HEAVY weapon! |
| OTHER CONVERSION SITES | REPENT-
Some outrageous Space Marine Termi conversions here...
CLOUSEAU'S CORNER- Craig Clark is still getting the new site up (which will hopefully include all his crazy Marine conversions), but here's a preview. CENTO INDUSTRIES- Chris Cates converts and paints Eldar and other minis, and has recenly upgraded his site to professional levels! SMALL OBSESSIONS- Mike McCuen's great page on conversions. |